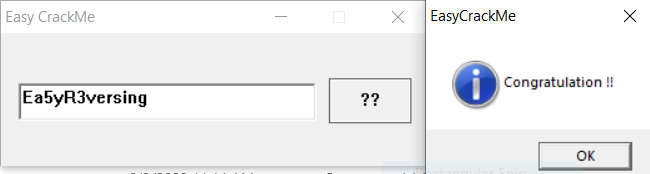
Easy Crack
The first challenge is easily accomplished through IDA Free. Follow the “Congratulation!!” string to where it is cross-referenced:
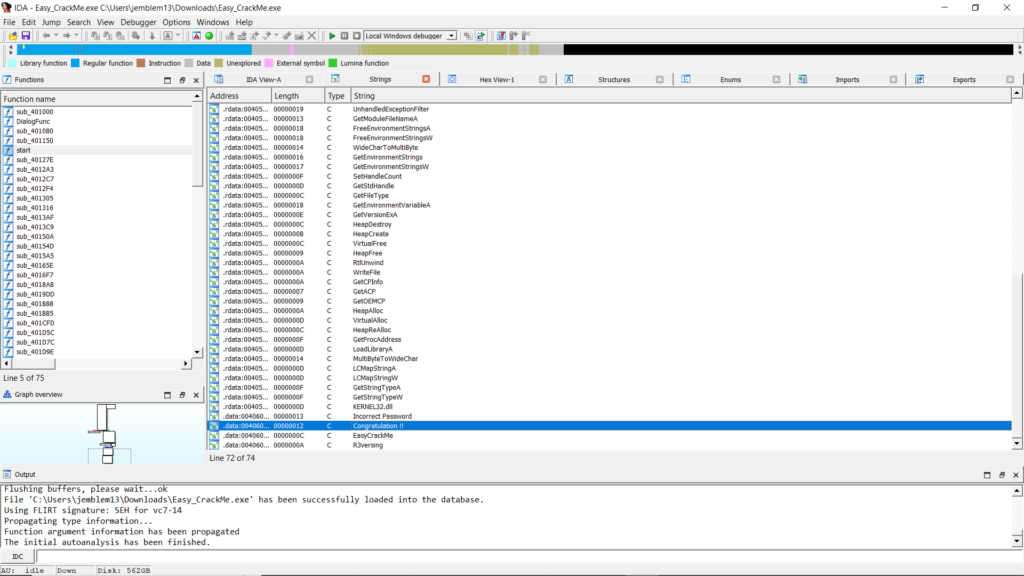
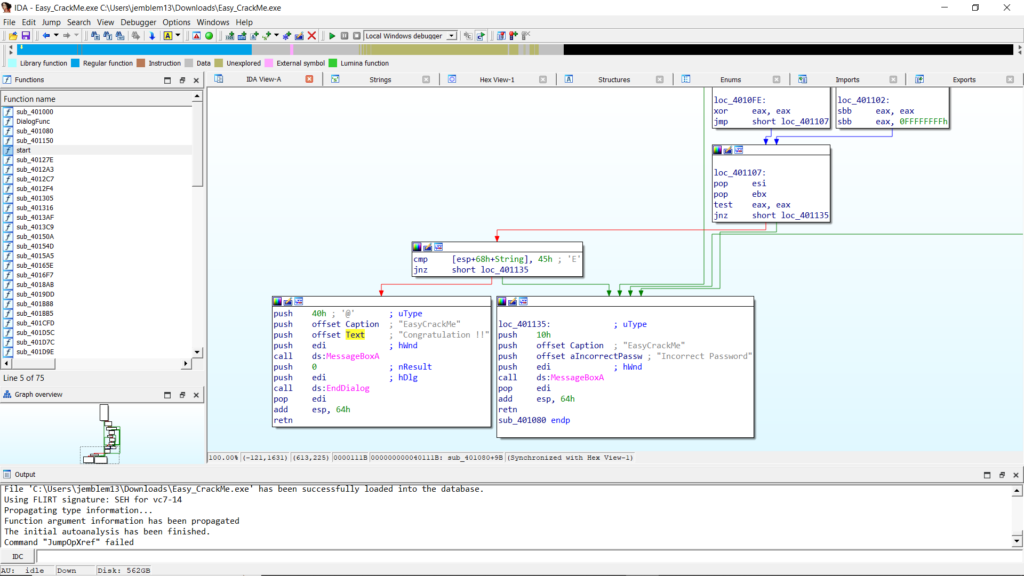
This takes you to a control-flow block where a byte of a String is compared to the character “E.” Traversing upwards, we identify where this string is input into the program.
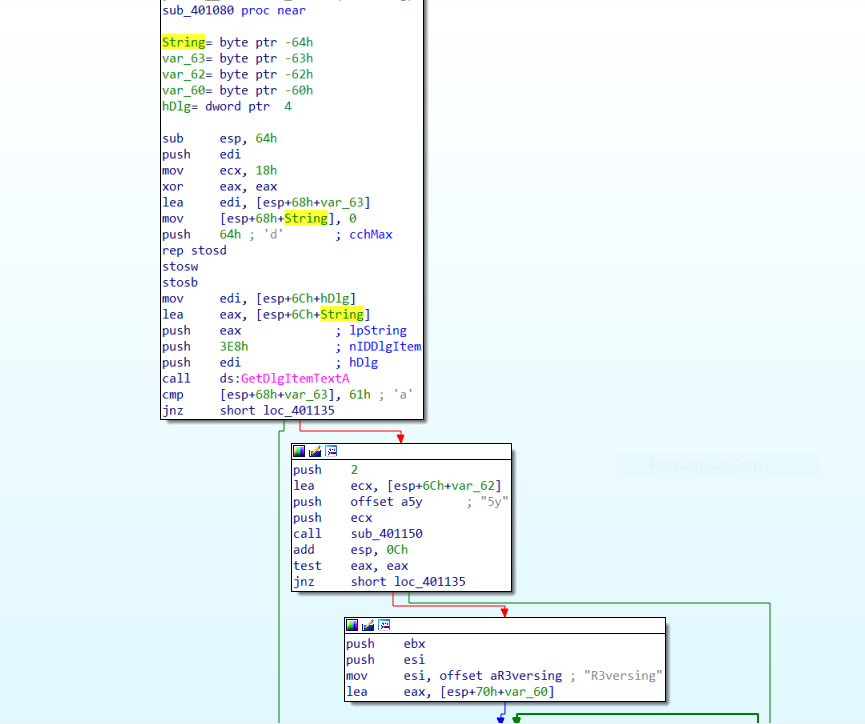
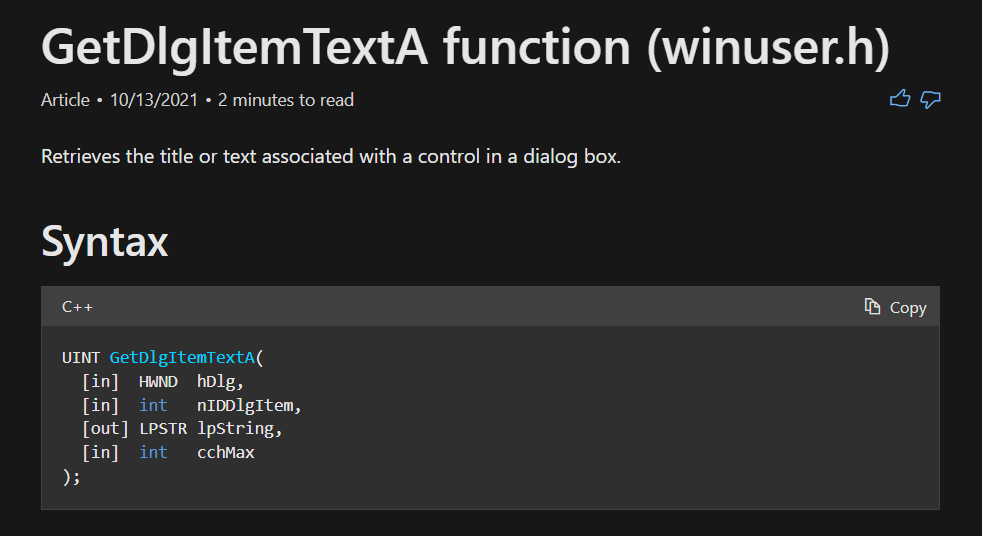
In this case, String is a buffer passed to GetDlgItemTextA. According to the API reference, we can see that we will input a key in the dialog box, which will be placed into this buffer:
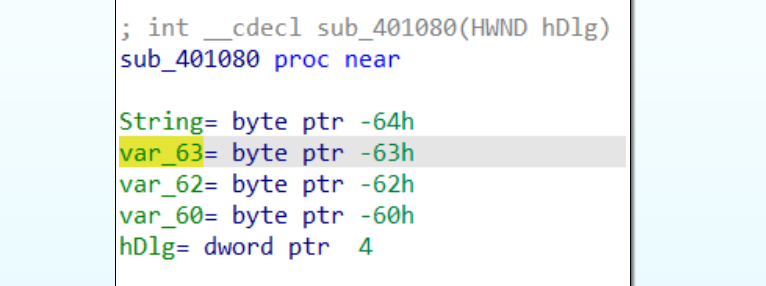
Looking closer at where the String buffer is on the stack, we can see that several variables lie mere bytes after the first character. This indicates that the variables are probably pointing to later characters, so we should rename them based on their position:
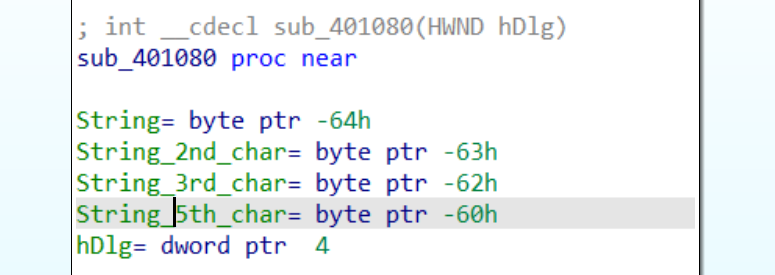
Looking forward to references to these variables, we pretty much complete the picture. As we noticed from the bottom of the function, the first character in the String buffer is compared against “E.” The next bytes can be found quickly:
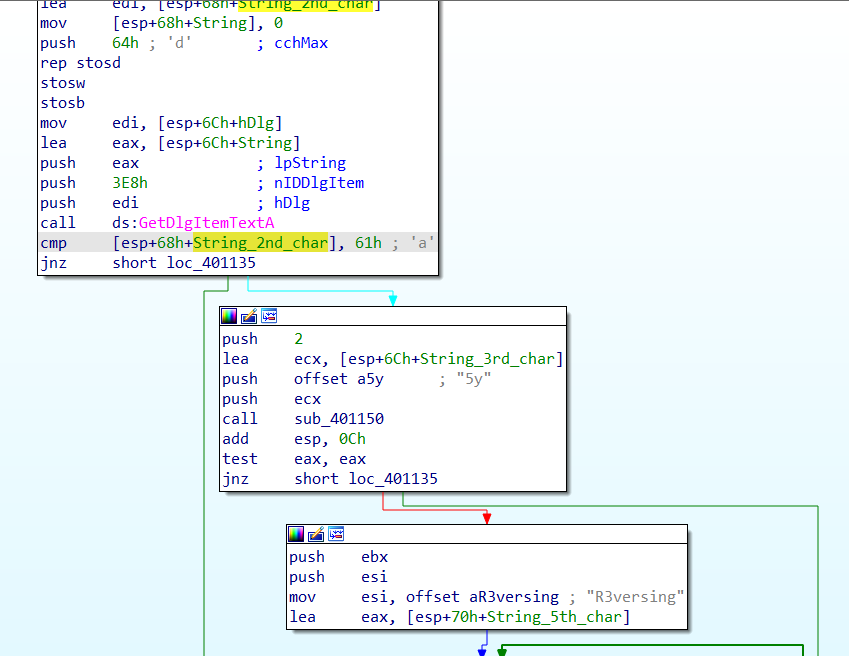
The 2nd character should be “a”, the 3rd and 4th characters should probably be “5y.” A quick look into sub_401150 shows that it is strncmp, a function that compares 2 strings, taking two pointers and a length as arguments. The function is called like this:
sub_401150(*String_3rd_char, *offset_5y, 2)The third and 4th characters should be “5y” in order for the function to return zero and continue to more functionality.
The next portion of the graph implements a comparison between the string “R3versing” and the buffer from the 5th character onward.
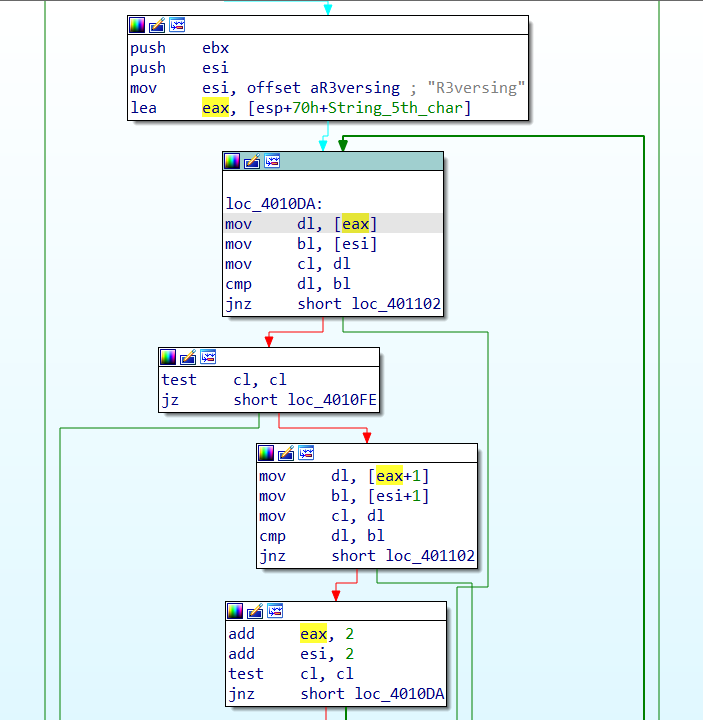
This comparison goes until the null byte at the end of the “R3versing” ASCII string. With this done, we test our theory on the crackme by running it.
Easy ELF
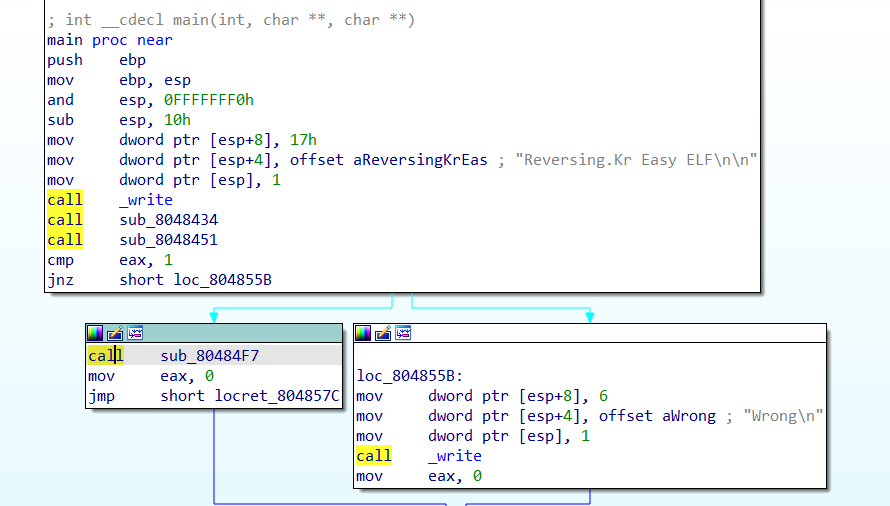
There are only few functions in this ELF, so we can jump straight to main in IDA Free by pressing G and typing in “main.” This takes us to the main control-flow:
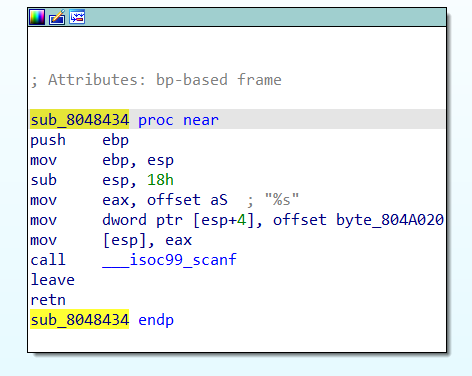
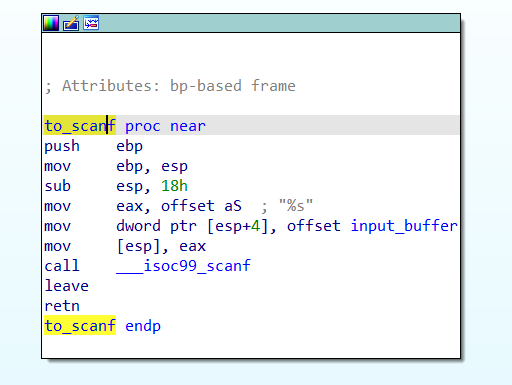
Stepping into sub_8048434, we can quickly see that it’s a handler for the function scanf. This function reads user input on the command line and copies it into a buffer. We can spot these structures and rename them, as well as the function:
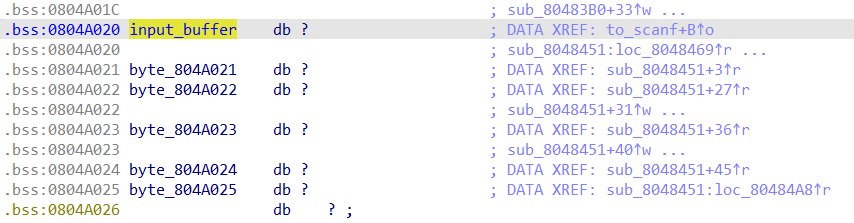
Double click on input_buffer, and we find that there are references to bytes very close to input_buffer. Again, we can conclude that there are checks on different characters in the input string. So, we rename these bytes to make the checks stand out later. In this case, I made an array of size 0x14 on the input_buffer offset instead of renaming all 6 references. This is generally a good idea, as it is typically faster when the buffer is longer.

By following cross-references to this input_buffer, or going back to main, we arrive at the function sub_8048451. We can quickly rename this “key_check,” noting the several byte comparisons:
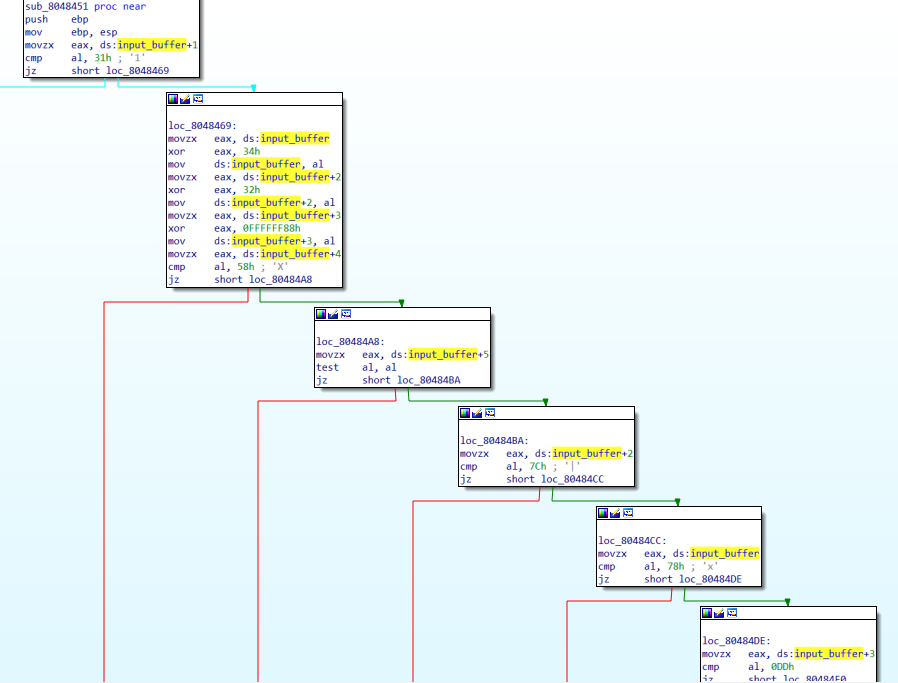
Right before the byte comparisons, we can see that a couple of bytes are XORed with hard-coded bytes. Here is the pseudocode for what happens in this function:
- The 2nd character (input_buffer+1) should be 0x31 (“1”)
- New 1st character = XOR first character with 0x34
- New 3rd character = XOR 3rd character (input_buffer+2) with 0x32
- New 4th character = XOR 4th character (input_buffer+3) with 0xFFFFFF88 (AKA -0x78)
- 5th character (input_buffer+4) should be “X”
- 6th character (input_buffer+5) should be 0x00, a null byte
- New 3rd character should be 0x7C
- New 1st character should be 0x78
- New 4th character should be 0xDD
Since the XOR operation is “symmetrical,” we can get the key by taking the checked bytes and XORing them with the specified keys.
- 1st character = 0x78 ^ 0x34 = “L”
- 2nd character = “1”
- 3rd character = 0x7C ^ 0x32 = “N”
- 4th character = 0xDD ^ 0xFFFFFF88 = “U”
- The instruction mov ds:input_buffer+3, al only moves the low byte, so the higher-order 0xFFFFFF are left behind.
- 5th character = “X”
- 6th character = 0x00
We can see this transformation in one operation using CyberChef. For the XOR key, we input bytes where characters were XORed and leave as null bytes when characters are not transformed:

These make up the ASCII string “L1NUX”\x00. So this is our input! You can run it in a VM if you’d like, but I did confirm it 🙂
Easy Unpack
This program uses a simple packing mechanism, as well as some inline resolution of APIs. Many malware samples use similar techniques. In this case, there is only 1 defined function, which is a good sign of a packed sample.
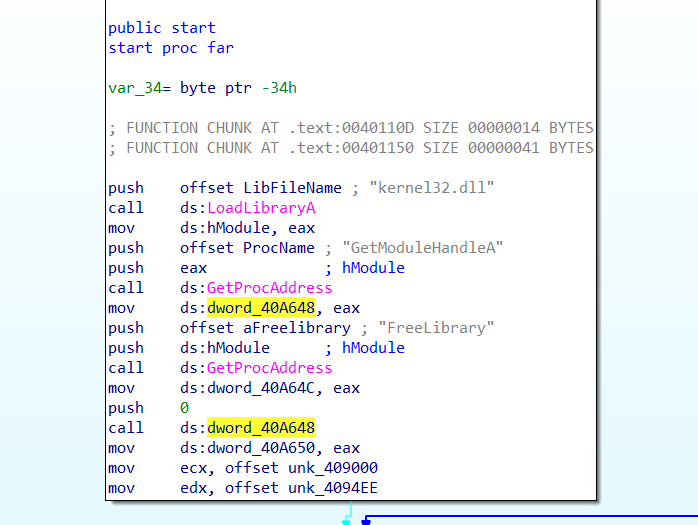
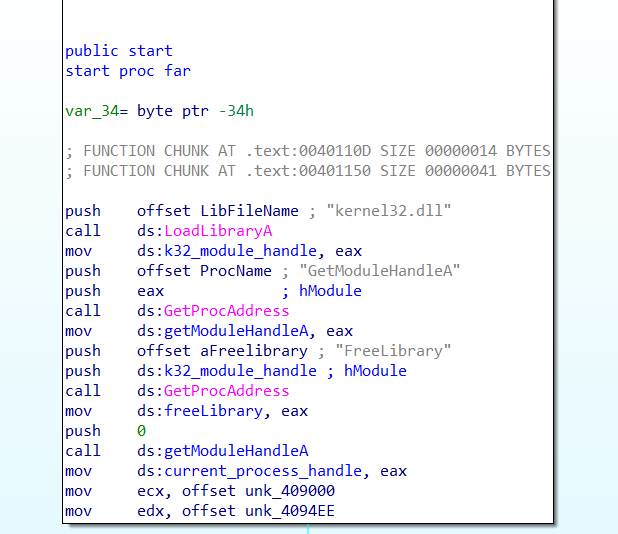
At the beginning of the start function we see the kernel32.dll library is loaded and the function GetModuleHandleA is resolved and called. Renaming variables makes this clear:
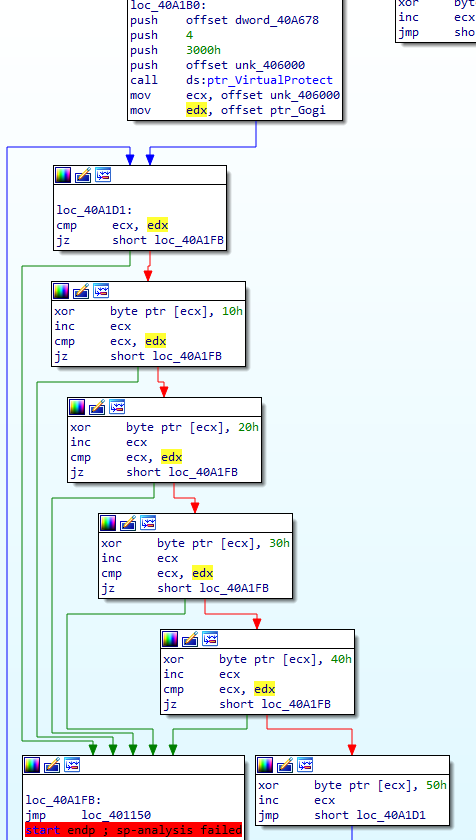
Looking at the next part of the control flow, we can see that XOR decryption is occurring. The offset moved into edx is of particular concern to us here:
What we have here is called “rolling XOR” or “multi-byte XOR” decryption, because the key proceeds to another byte as the data does. This XOR key, 0x1020304050, will show up as a recurring pattern in the encrypted data in null spaces. Example:

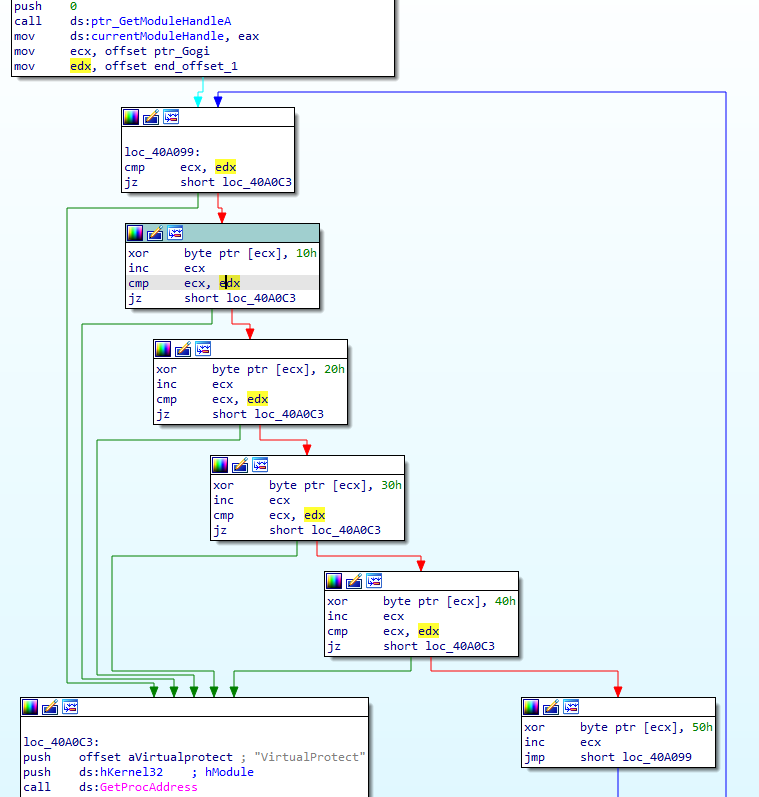
Going back to the previous code, the value in ecx, a pointer to what we believe is an encrypted buffer, is constantly compared against the unchanging value in edx. This makes it clear that 0x4094EE, the value in edx, is where decryption stops (for now). I re-labeled the value “end_offset_1.” I also re-named the address passed into ecx, 0x409000, to “ptr_Gogi,” since it points to the beginning of the section, and I like to make my variable names as informative as possible, since we’ll see this pattern recur.
Next, the packed program dynamically resolves and calls VirtualProtect:

In this case, VirtualProtect is being called with several arguments, and after some Googling of the arguments, you can replace the constant values by right-clicking and selecting “use standard symbolic constant.” The only thing we want to change for the time being is the 0x4 that gets pushed, which is the new protection value for that region (in this case, 4096 bytes after 0x405000, the section .rdata). That value is PAGE_READWRITE, which tells us that this section is likely to be modified soon. Before moving on, I marked 0x405000 as ptr_rdata.
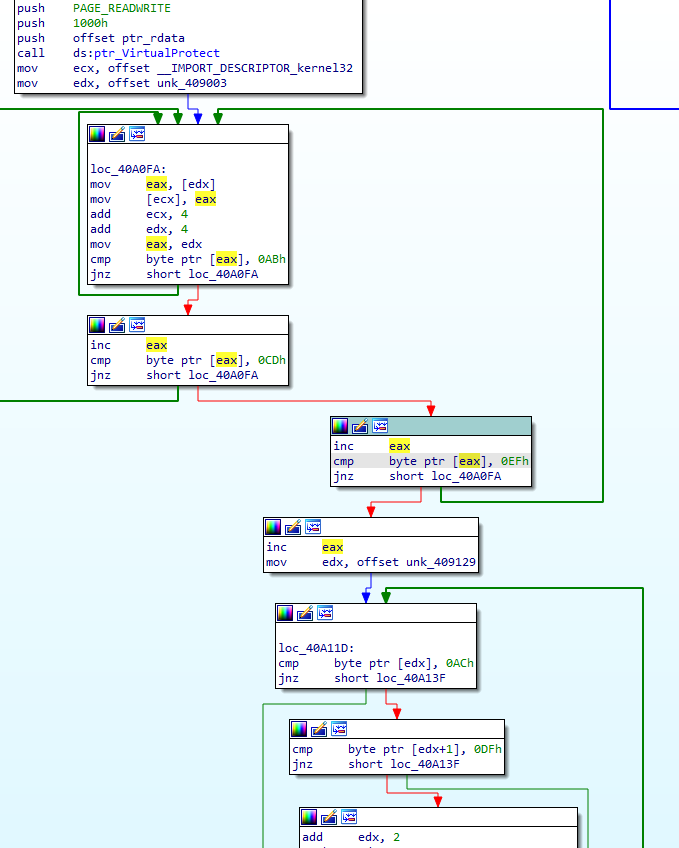
How about this next section? The value 0x409003, moved into edx, is 3 bytes into the section .Gogi, which was just decrypted in the previous loop. We’re using the decrypted .Gogi to overwrite the data at the pointer moved into ecx, which appears to be a (currently small) import table. The loop continues copying while searching for a contiguous 3-byte value AB CD EF, which is probably artificially added to mark an important next piece of data. Then, we see 0x409129 moved into edx, where it is expected we will find another constant pattern AC DF. While we can see there is a larger loop here, it’s a simple check. Let’s get a better look at the loop itself:
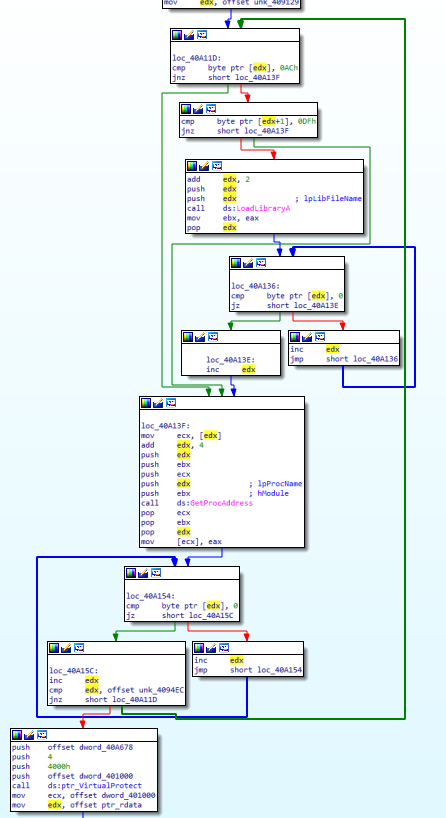
Knowing we’re writing right after a section that looks like an import table gives us a first hint, and the APIs LoadLibraryA and GetProcAddress further support the theory that the packer is now building the Import Address Table at the address in edx. It appears that library names are preceded by AC DF and two more bytes. Once LoadLibraryA is called, the address in edx is incremented until a null byte is found (the end of the library name), then incremented again for the null byte, incremented once more by 4, then passed to GetProcAddress. The address in edx at this point should point to an API function. After incrementing edx until the end of the function name, the packer searches for the next item, which may be either a library name or the next function name within the same library. The end of the section to be parsed is 0x4094EC. The last block we see calls VirtualProtect, again with the page permissions PAGE_READWRITE, on about 16 KB of the section .text pointed to by address 0x401000 (which is often the virtual address of .text, where unpacked payloads tend to execute). So now, we expect the .text section to be modified:
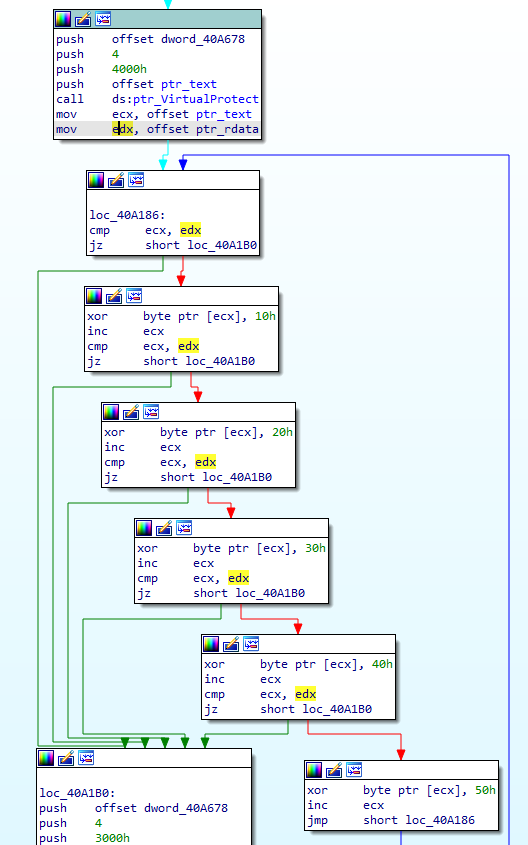
This should look familiar; we’re using the same rolling XOR key to decrypt .text, incrementing ecx until the address of the .rdata section is hit. Knowing this, let’s move onto the last decryption phase:
This last flow decrypts the .data section in the same way as previous blocks, then jumps to a particular address. This last block, which we can recognize by both the unconditional jump instruction JMP and the pure distance of the jump itself, is a tail jump. This is a recognizable feature of many packers, a jump to where the unpacked data takes control of execution. The distance is from 0x40A1FB to 0x401150, a huge jump almost to the beginning of the binary in the .text section. We’re jumping from the section .GWan, at the end of the binary, which is a common location for a packer’s stub or unpacking code. And this is the end of the packer. In order to test our theory, we can either just debug and run to this tail jump, or we could write a script to statically unpack this. The flag for this challenge is simply the address of the OEP, which we believe should be 0x401150, so let’s debug! We set a breakpoint on the jump to our OEP, then step once:
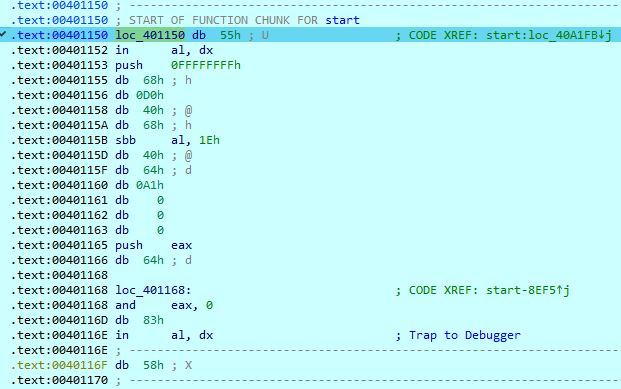
We land in some bytes that haven’t been accurately disassembled. We can try to clean things up by pressing “C” for Code, but since we also have some code incorrectly disassembled (the “in al, dx” is the issue here) we first need to undefine the bad instructions by pressing U. Then we can press C, which should disassemble the first byte 0x55 to push ebp. If we keep undefining bytes and redefining code until we get to a return opcode (0xC3 at 0x40123A), we get a pretty complete-looking function!
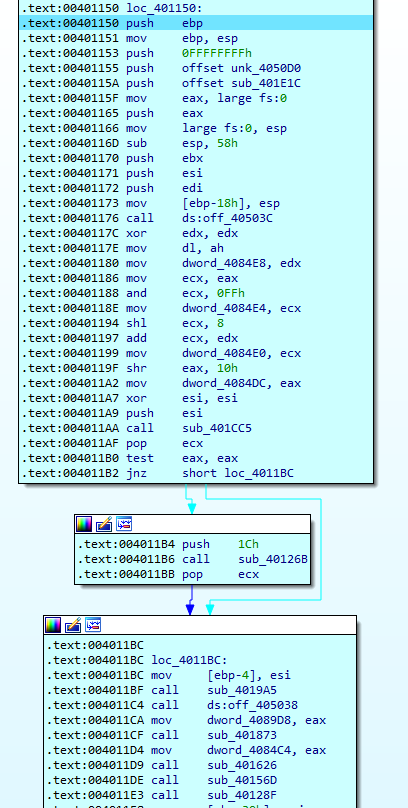
Actually, the only thing we had to find for this challenge was the OEP! The flag is 00401150.
Thanks for reading!