Lately, I’ve been planning some projects related to learning plans for my interns and overall knowledge transfer for reverse engineering and forensics. I think as technical people in cybersecurity we all eventually understand and seek to fix the gaps in our knowledge, but ultimately we need to contribute to projects and tools that preserve that knowledge for future generations and make it more widely available. This is one of the reasons I support OpenSecurityTraining2 and hope they continue to post great technical training.
After many conversations on the topic I firmly believe that we cannot trust academia to be incentivized to teach this content properly and promptly. I will also shout out pwn.college on the binary exploitation side of things, a program that is already proving that the support of a university and motivated students can create something lasting. But courses can be short-lived and motivated CTF teams can eventually move onto other pursuits.
Course Methodology
Anyways, into the course. RE3011 uses all ELF binaries written in C++, compiled using g++. I was intrigued by their statement up-front that we wouldn’t be using decompilers to learn C++ reversing, as it is done so commonly nowadays. I suppose the reason could be a more involved learning process and ensuring the learner will still be able to work even when the decompiler fails, but at the end of the day I think it is still a good tool to confirm things look overall like C++ code. I’m following along with Binary Ninja and switching between views because I want to ensure it looks like I expect, and because using the HLIL is my normal workflow at my job.
The RE3011 course is great and covers the following:
- Class Objects
- Single Inheritance
- Virtual Functions
- Multiple Inheritance
- Basic Templates
The main prerequisite is understanding of assembly, for which I highly recommend the OST2 course Architecture 1001: x86-64 Assembly by Xeno Kovah.
While reading this blog, I encourage you to give the course a shot and to do the work of learning about C++ reversing via the provided exercises before reading the solutions, which will have plenty of spoilers.
Class Objects and Structures
The basic example TheAnimal involves renaming, creating structures and retyping struct members using Binja. This wasn’t too difficult, but I wasn’t familiar with the process of creating structures in disassembly view rather than in the High-Level Intermediate (HLIL) view.
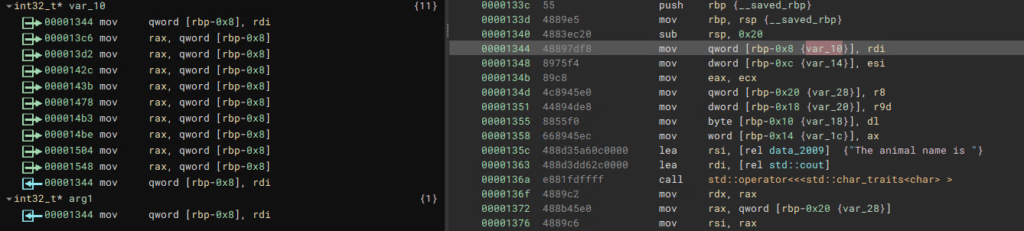
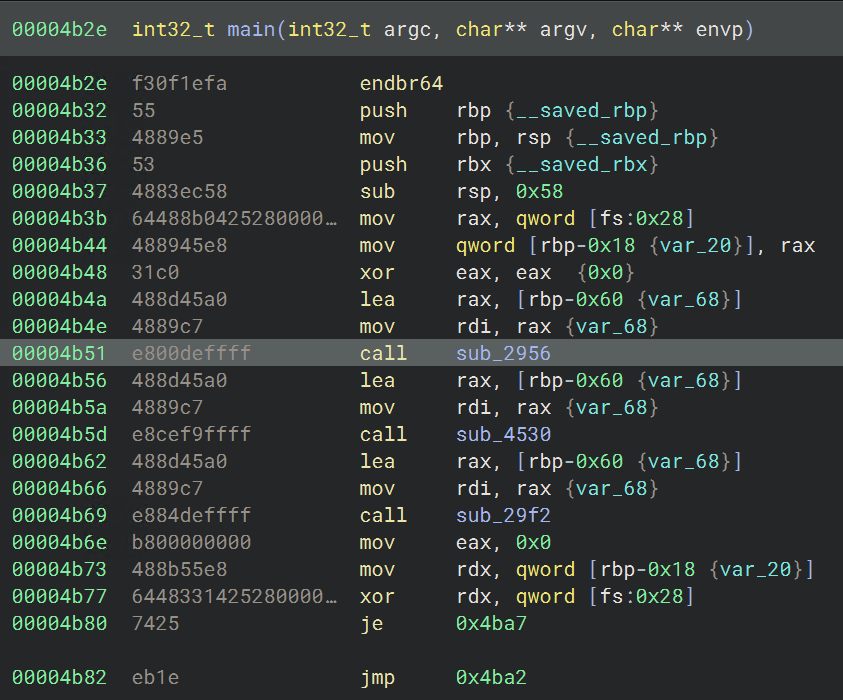
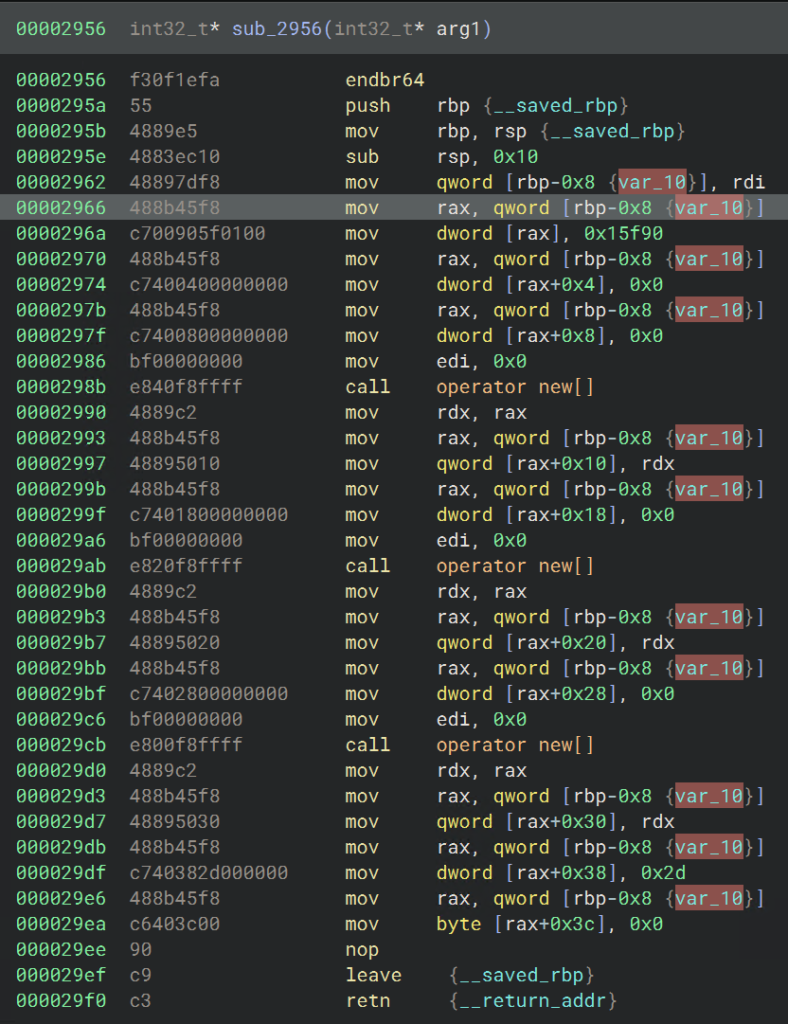
Identifying the variable that holds the beginning of the struct was the main challenge here. This was not too hard, as the many cross references to var_10 in this case indicate that offsets from that variable were calculated to interact with members of the class:
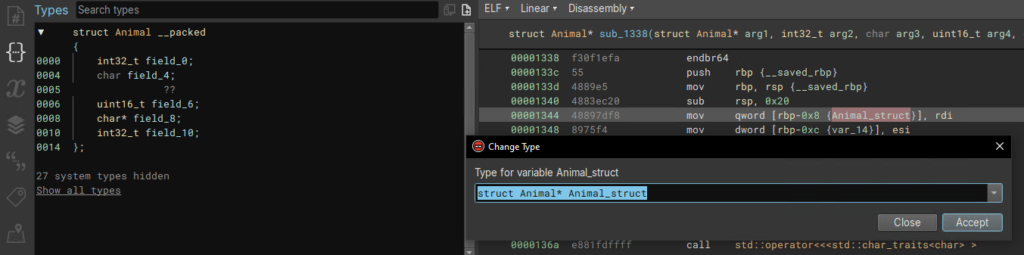
After highlighting var_10, we can use the S key to create a structure, which we can name Animal. The size is not necessary to enter in this case. If we highlight var_10 and press S again, Binary Ninja creates members for the structure automatically. By pressing Y with this variable highlighted, we can see it is already retyped as struct Animal* and several fields have been created for us in the Types window. The overall function has also been changed so that the return type is struct Animal*, as is the first argument passed in:
By clicking on each member in the struct in the Types window we can follow the cross-references and name them according to their usage and the values they are assigned. This requires identifying variables of interest to pivot on, and following the flow of the code. I recommend renaming the variables as well. We rename these and members of the class Animal using the N key.
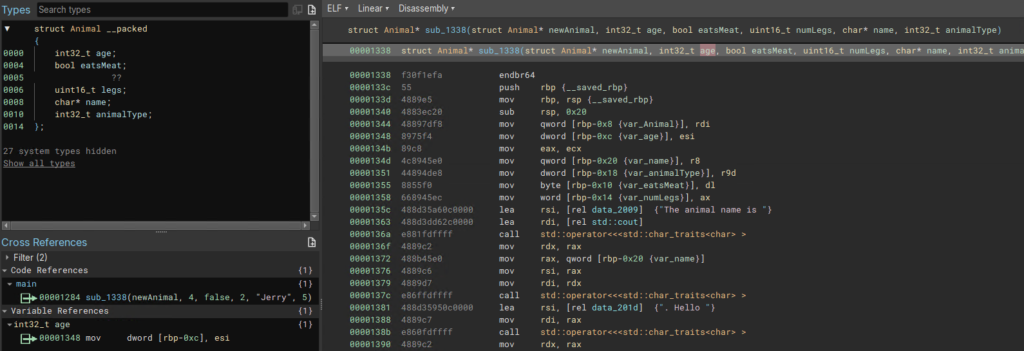
We can see that the types of the variables have propagated to the arguments of the function, so we can also rename the arguments. By highlighting the argument you can see which register Binary Ninja marked as corresponding. In this example we can see that highlighting the 2nd argument shows esi in the variable references, which is moved into var_age, so we can rename the 2nd argument as age or arg_age as I sometimes do. Note, I have also retyped the eatsMeat member of Animal as bool. This isn’t strictly necessary but beautifies our decompilation a bit.
Heading back to main, if we switch to the HLIL for a moment, we can see that renaming and retyping arguments has paid off, so we can confirm that our assertions make sense.

With this all done, the questions are fairly easy to answer. One note, someone asked a question about why the allocated space for the struct is 0x18 bytes, while the member variables only take up 0x14 bytes. This seems to be the compiler aligning to multiples of 8 bytes, as the last 4 allocated bytes are unused and Binary Ninja auto-creates a struct of only 0x14.
Lab 2, The Zoo (Basic Inheritance)
I had a pretty decent time with this lab but went about it differently than I usually do, working from the strings to identify the vftables for each class instead of going through main and understanding control flow.
Identifying Base Class and Constructor
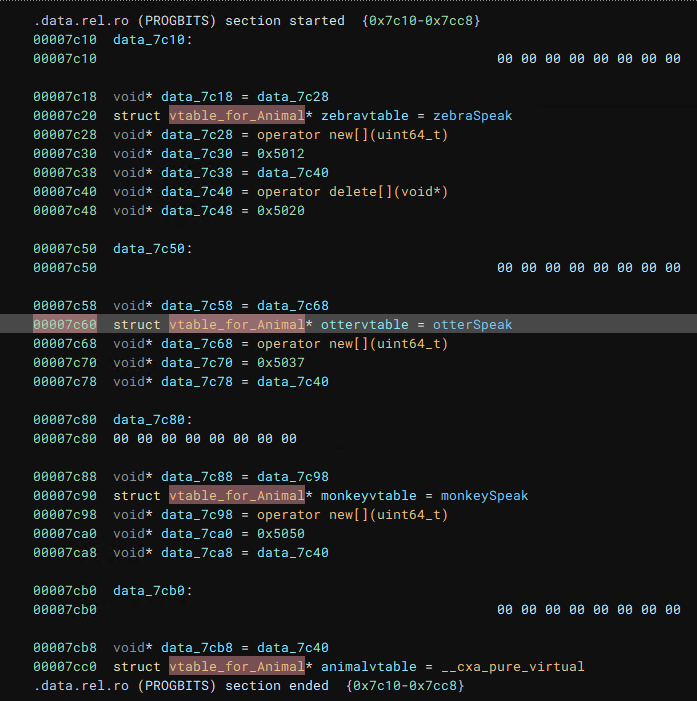
We can start by following the string “I’m a Zebra” to its reference in a function, which you can name zebraSpeak or whatever you like. This function is cross-referenced in the vtable for the Zebra derived class, and we can find all of the vtables by following this reference to the .data.rel.ro section. I labeled the 3 vtables like so:
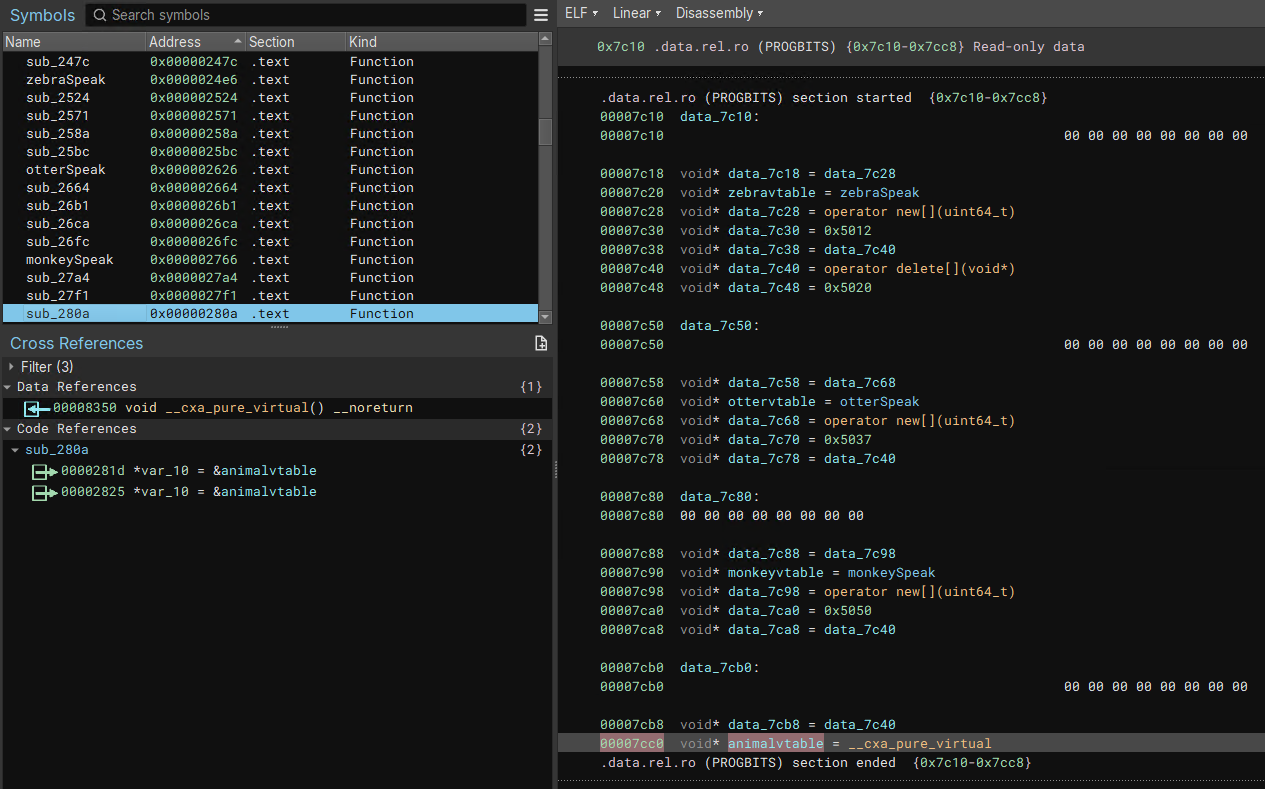
Based on the vtables above it and it being used in the base class constructor, the last vtable likely belongs to the base class Animal. After identifying and renaming the 4 vtables, we can navigate via cross references to the 3 respective constructors for Monkey, Zebra and Otter. Each of these constructors contained a call to 0x280a, which should be the base class contructor (Animal).
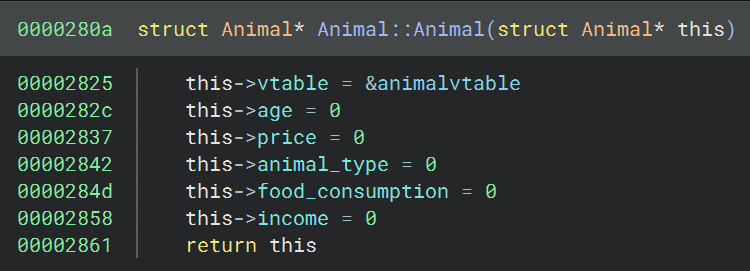
Then, looking at sub_280a, our top candidate for the base class constructor, I figured var_10 would be a good place to create and apply a structure for the class Animal.
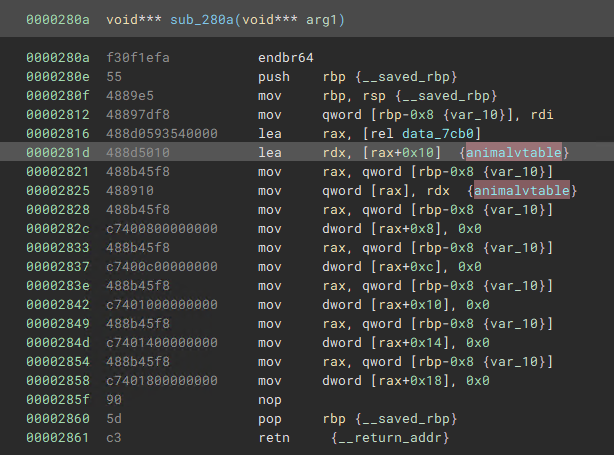
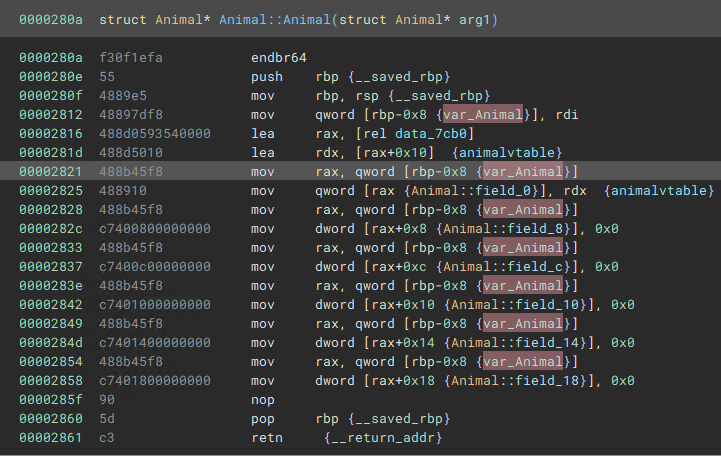
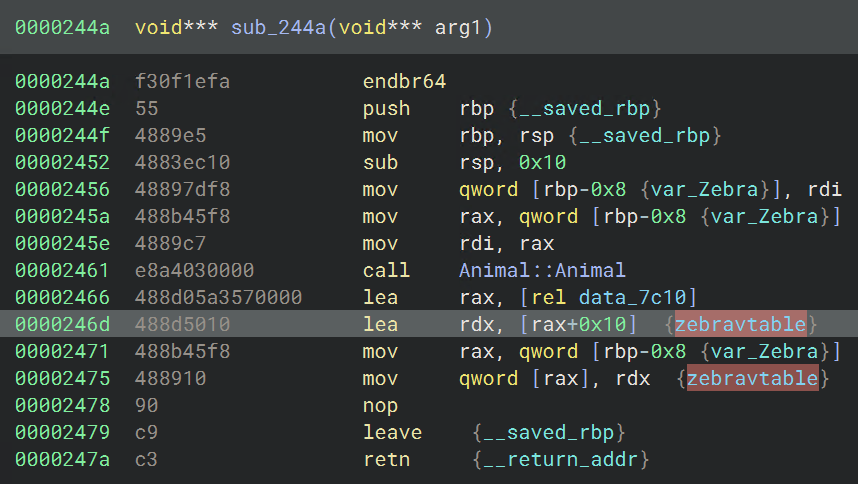
We can see that the first member field_0 receives the address of the Animal vtable, so we can rename that member of the class to “vtable.” After defining the base class Animal, we can navigate to the first usage of this Animal constructor through cross-references, to sub_244a. This looks like a constructor for Zebra, given it calls the base class constructor and passes in the Zebra vtable.
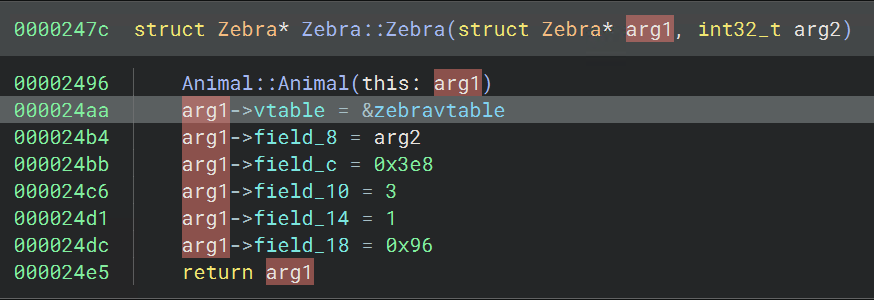
The next reference to Animal::Animal, at sub_247c also uses the Zebra vtable and seems to initialize class members:
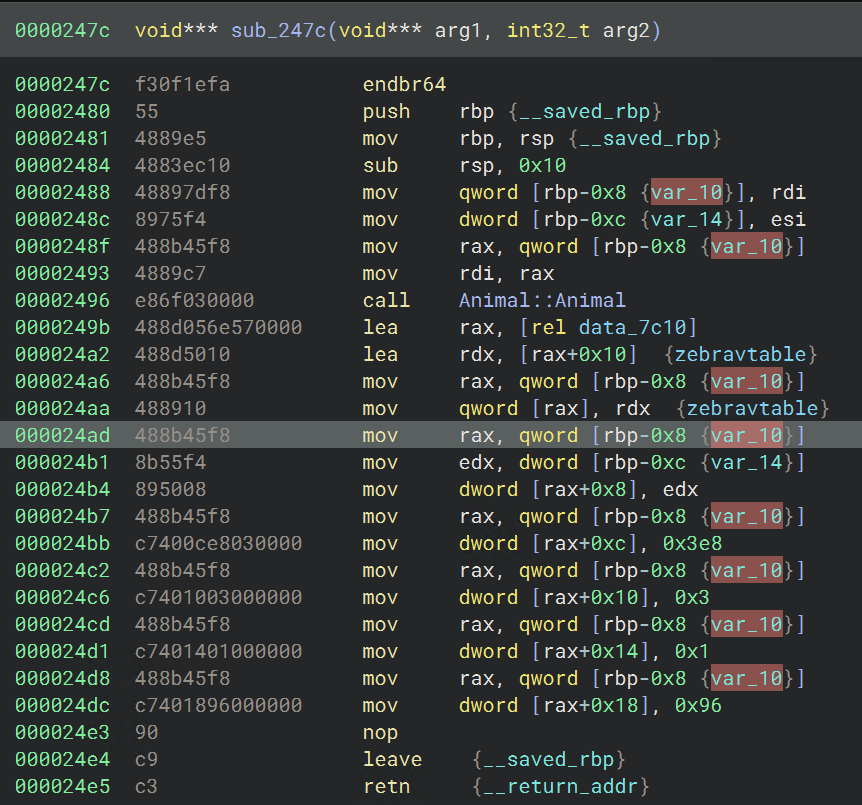
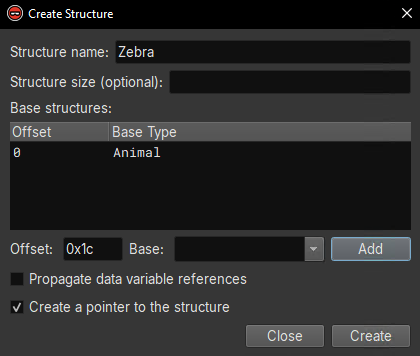
This second constructor is the better place to create the struct for the Zebra class, since all of the members are visible, but in this case the derived class Zebra will have the same members as the base class Animal. In any case, we can create the struct for Zebra from the variable var_10 by selecting it, then pressing S to open the structure window. We then place the base class Animal at offset 0 and press Add. The window should look like this before you hit Create:
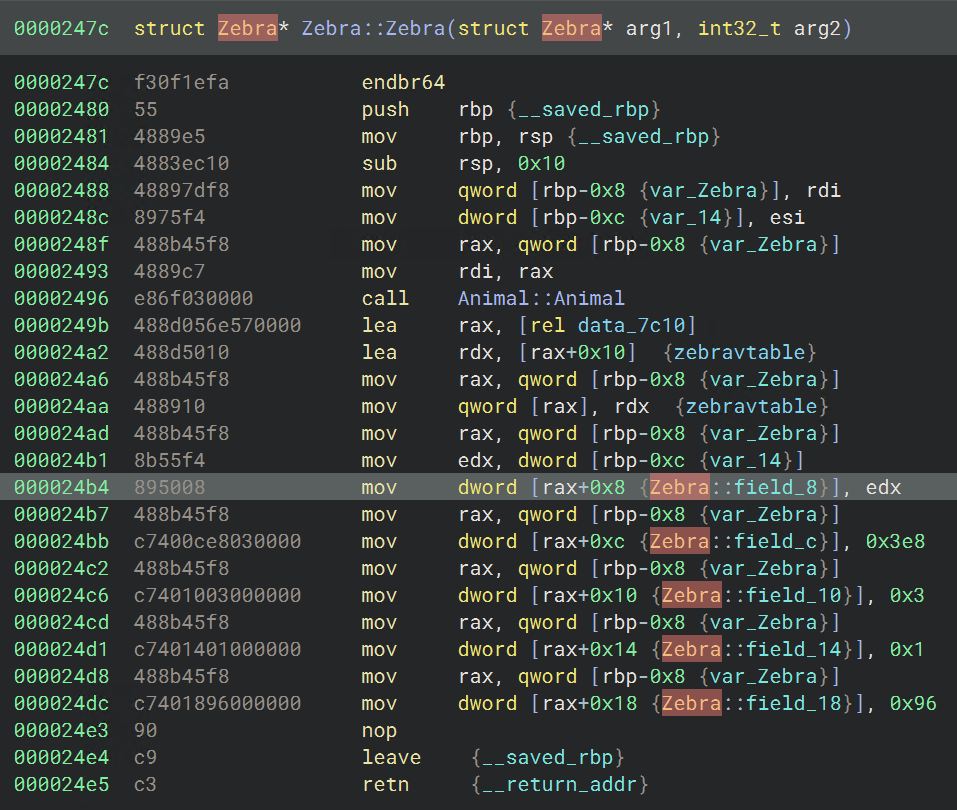
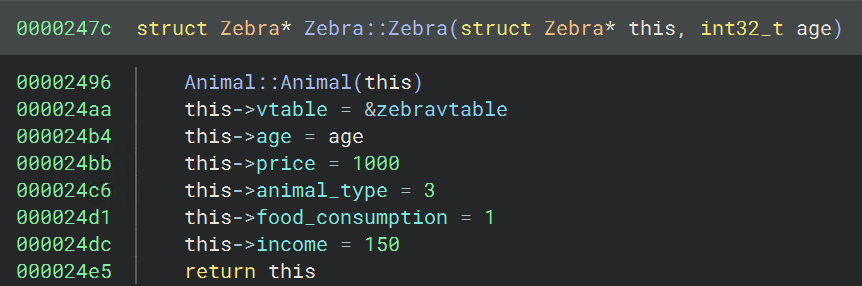
Then, after renaming some variables and parameters (for the argument, you can retype to struct Zebra* `this`), we have the Zebra struct applied. This improves the corresponding HLIL:
Now we can apply this struct to the other Zebra constructor, which you can find by following the Zebra vtable references. We then find the constructors for Otter and Monkey, by following their vtables or the Animal constructor, and create their structs in the same way.
Labeling Class Members
Once types have been applied, now we can do the fun part of figuring out which field corresponds to which attribute of our derived class objects. Since all of the derived classes seem to have the same number of fields, we can just rename the members of the base class Animal in the Animal constructor, and it will propagate.
Before proceeding with the walkthrough, I encourage you to give it a shot examining the program for clues. In fact, I didn’t fully understand the purpose of the last 2 fields until creating and applying the struct for Zoo (this will be done in upcoming sections).
SPOILERS AHEAD:
Typing Virtual Function Tables
Now that we have our base and derived classes labeled, we need to re-type the vtable members of those classes so that virtual function calls are properly linked. For this part, I basically followed the guide in the Binary Ninja docs.
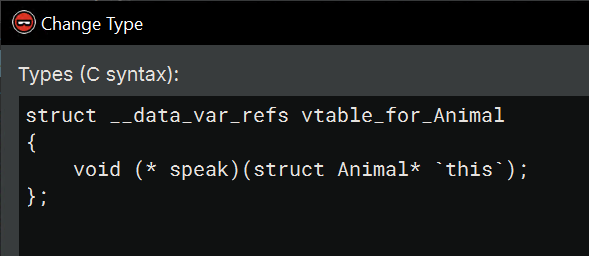
Since the base class Animal seems to have only one virtual function, the type for its vtable will be fairly simple. To add a new type, navigate to the Types window, right click inside the listing window and select “Create Types from C Source.” I typed in the following:
struct __data_var_refs vtable_for_Animal
{
    void (* speak)(struct Animal* `this`);
};
Once this is created, we need to update the base class Animal. You can select it in the Types window and press Y, then retype the vtable member like so:
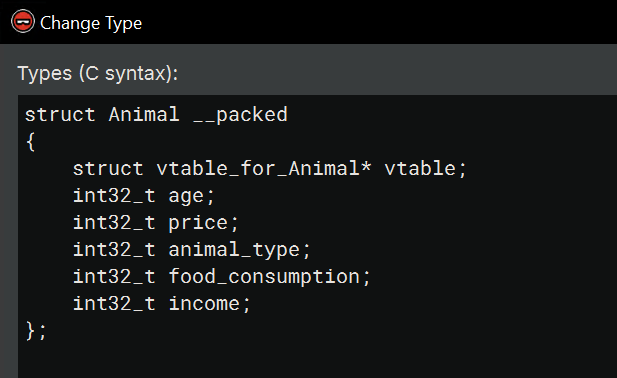
struct Animal __packed
{
    vtable_for_Animal* vtable;
    int32_t age;
    int32_t price;
    int32_t animal_type;
    int32_t food_consumption;
    int32_t income;
};
Now that the Animal class includes a pointer to the proper vtable structure, we can also apply that type to the vtable in the .data.rel.ro section.
vtable_for_Animal* animalvtable
After applying this, I realized there’s not much point in creating types for each of the vtables of the derived classes, since they all (Zebra, Otter, Monkey) have just one virtual function. The vtable member of all 3 derived classes is automatically retyped to vtable_for_Animal* via inheritance from the base class. So all I needed to do to finish up was retype the other vtable pointers in the .data.rel.ro section:
Now that we have properly applied types to all the vtables, we just need to apply the right derived classes where necessary and our pure virtual calls should show up.
Anyways, with all of this labeled we should have the answers to all 5 questions in The Zoo Part 1.
TheZoo Part 2: A New Base Class
For this part, we will need to do more reversing and add a new Class to our binary TheZoo. This will help us understand the overall control flow of the binary better so that we can identify where to apply the Animal type and its derived classes. The constructor for this new class can be found in main:
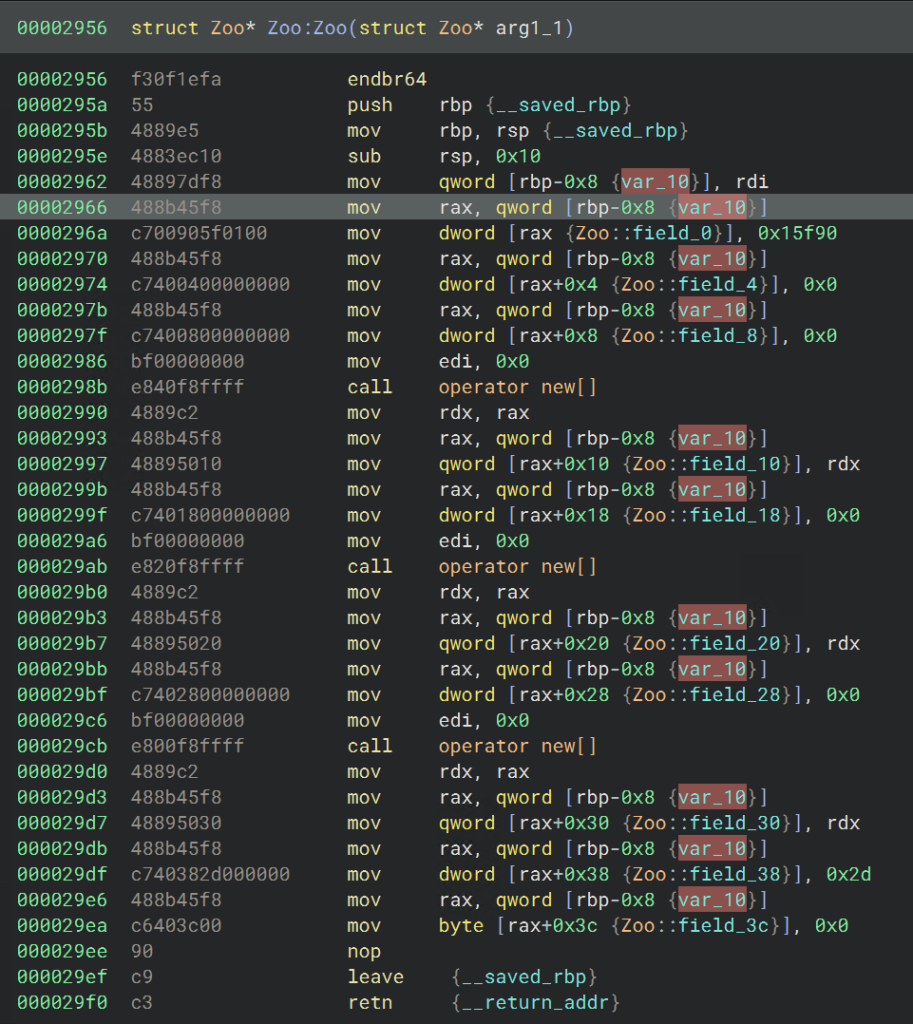
Within this function, we can see a number of offsets being referenced, which are presumably fields of a struct. After selecting the proper variable, we can make a class named Zoo just as we previously made the base class Animal.
With that done, we need to start applying the Zoo type all over the place in this binary. Note that just because you type a variable in a function doesn’t mean that type will propagate to functions within it when the variable is passed. Applying the type accurately will be important when we want to look at references to the various fields.
Labeling Zoo Class Members
Once the type is pretty much applied everywhere, we can come back to the Zoo constructor and look at the cross references to each field. For example, field_4’s cross-references look like this (after we rename some of the parent functions for the Animal constructors):

Since it seems to increment when there’s a new animal and decrement in some function I haven’t named yet, I’m guessing it’s the number of animals in the zoo. Again, this is the fun part of reversing and I encourage you to explore the binary on your own before proceeding.
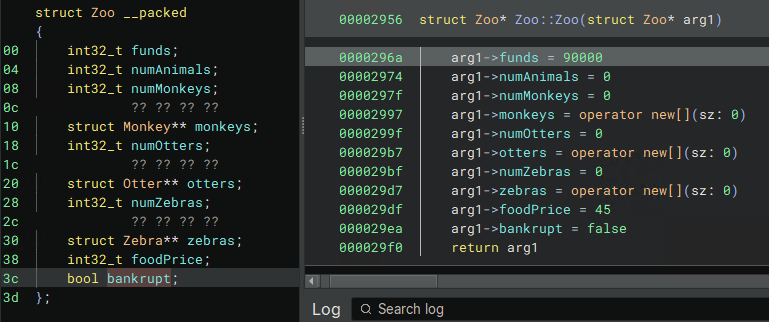
The only thing that is different with this base class is that the Zoo has members that are arrays of animals. When you’re done, your structure and constructor should look a little like this (SPOILERS AHEAD):
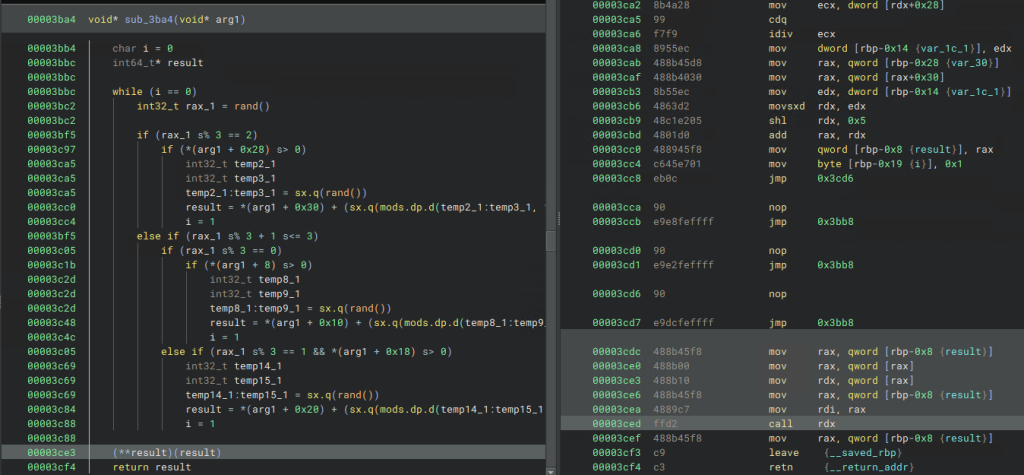
Reversing these objects is necessary to understand the function where a virtual function gets called (which is the question for this section). The question asks which functions could be called by the virtual call at 0x3ced, which is in turn called by sub_3ba4. sub_3ba4 looks like the below screenshot before applying types and renaming (the highlighted line shows the virtual call):
After applying the Zoo type to arg1, the HLIL becomes noticeably clearer:
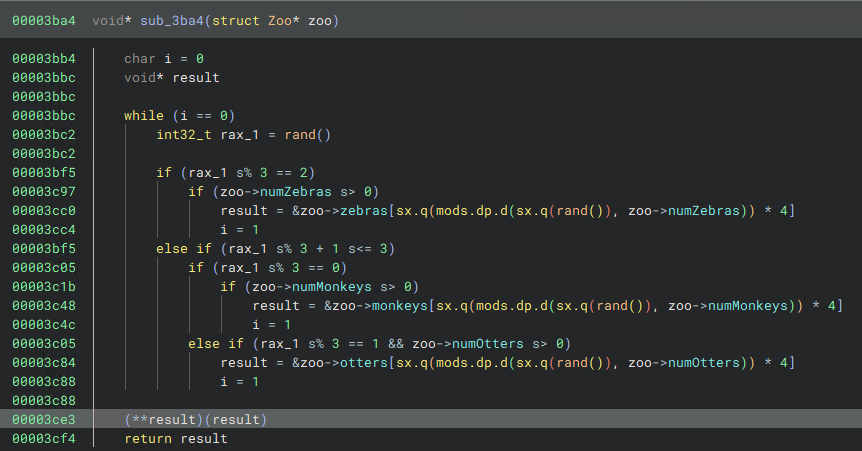
sub_3ba4 with the Zoo struct applied.With this done, we can see that result will either be a Zebra, Monkey or Otter based on a random number. Since one of these is the class that has its virtual function called and all inherit the base class Animal, we can just retype and rename result as Animal* random_animal and we will get the following in HLIL:
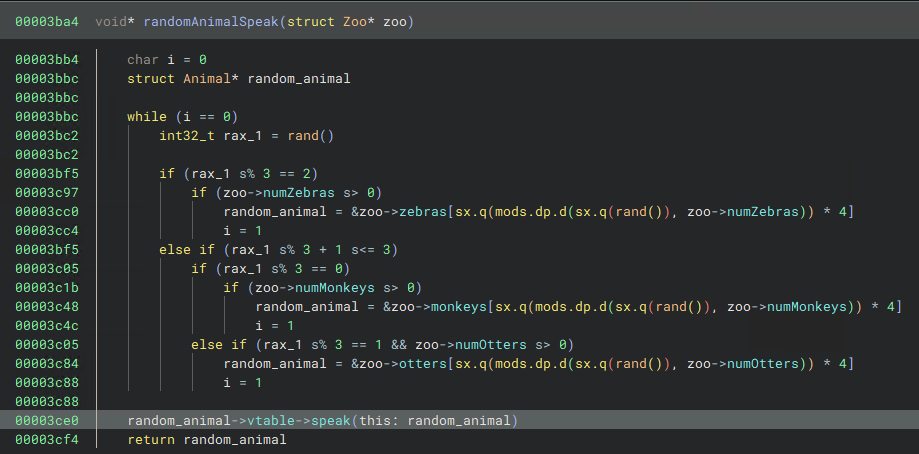
sub_3ba4 after applying the Animal type to and renaming the randomly selected animal.The 3 virtual functions that can be called at this line are all pointed to by the vtables of the 3 derived classes, so perhaps given there’s only 3 virtual functions in the base class Animal to choose from, these answers could have been guessed. But sub_3ba4 could have excluded one or more animal types, limiting which of the 3 virtual functions could be called, so it was a good idea to do some reversing to be sure.
Conclusion
So far we’ve covered Basic C++ Objects, Single Inheritance and Virtual Functions. In Part 2 of these walkthroughs, we’ll cover the second half of the course on reversing Multiple Inheritance and Templates using Binary Ninja.
P.S., I left the answers out of the walkthrough to encourage actively following the steps, and because the answers are in the walkthroughs on OST2, but if you get stuck or want to confirm feel free to comment. Thanks for reading!